Website Personalization
Change text, HTML, styles, and visibility on your live site by URL rules—without redeploying. One Przio project script also powers popups. This guide walks through creating an activity, building personalizations, optional A/B experiences, and reading activity metrics.
Overview
A personalization activity ties together: a target website URL (loaded in the editor through Przio's proxy so you can click real DOM nodes), page URL conditions that decide when the activity may run on your site, optional audience conditions (new vs return visitor, PrzioSDK.setAudience attributes, or a saved Audience Manager segment), and one or more experiences—each experience holds the list of element changes, HTML insertions, optional form styling, and click metrics for that variant.
While an activity is Live and your site loads the project sdk.js, the SDK evaluates URL + audience rules, chooses an experience (for A/B, by traffic split), applies changes in the browser, records views, and sends click events for elements you marked as activity metrics.
Prerequisites & script
- A Przio project with Website Personalization enabled for your plan (trial projects are redirected to upgrade when opening personalization).
- Project access as owner or member.
- The same embed script you use for popups. From the project page, copy Add to your website and place it before
</body>(replaceYOUR_PROJECT_ID):
<script src="https://app.przio.com/sdk.js" data-project-id="YOUR_PROJECT_ID"></script>
If the script is already on the site for popups, you do not add a second tag—personalization runs for the same data-project-id.
For single-page apps, after in-app navigation you can call PrzioSDK.triggerPersonalization() so rules are re-evaluated without a full reload (see sdk.js / project integration notes).
1. Create a personalization activity (detailed)
Activities are created from the Website Personalization list for a project. Only Activity name and Website URL are required. URL conditions and A/B are optional in this dialog—you can refine everything later in the editor.
The flow: open the list → Create Personalization → fill the modal → Create → you land in the editor on a new draft activity. Replace each screenshot placeholder below with your own PNG (paths are under documentation/personalization/screenshots/).
Step 1 — Open Website Personalization for your project
Go to your Przio project dashboard. Open the Website Personalization tool (project tile or navigation). The URL includes ?projectId=... so the list is scoped to that project.
- If the project is on a trial plan, you may be redirected to upgrade—personalization is not available until upgraded.
- You must be signed in as a project owner or member.
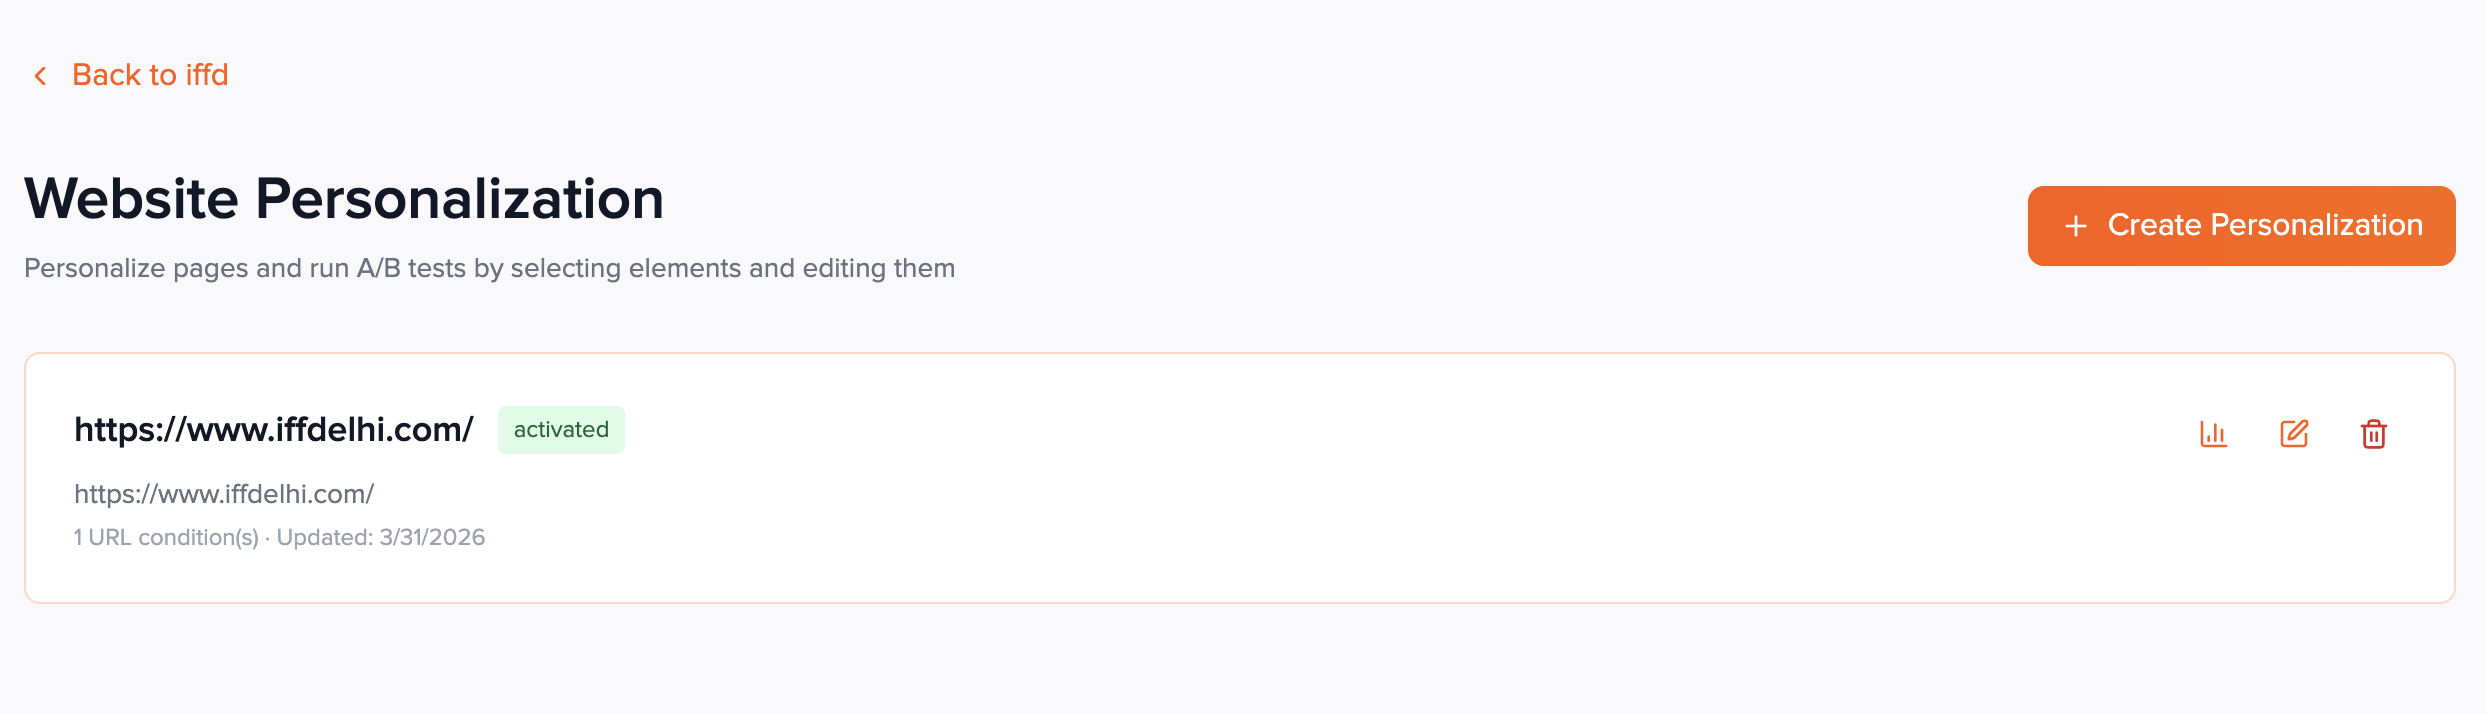
- You either see a grid of existing activity cards or an empty state with a short message and a primary button.
Step 2 — Open the create dialog
Click Create Personalization in the top-right of the list. If you have no activities yet, the same action appears as Create Your First Personalization in the empty state.
- A full-screen overlay opens with the title Create Website Personalization and a close (X) control.
- You can dismiss with Cancel at the bottom without saving.
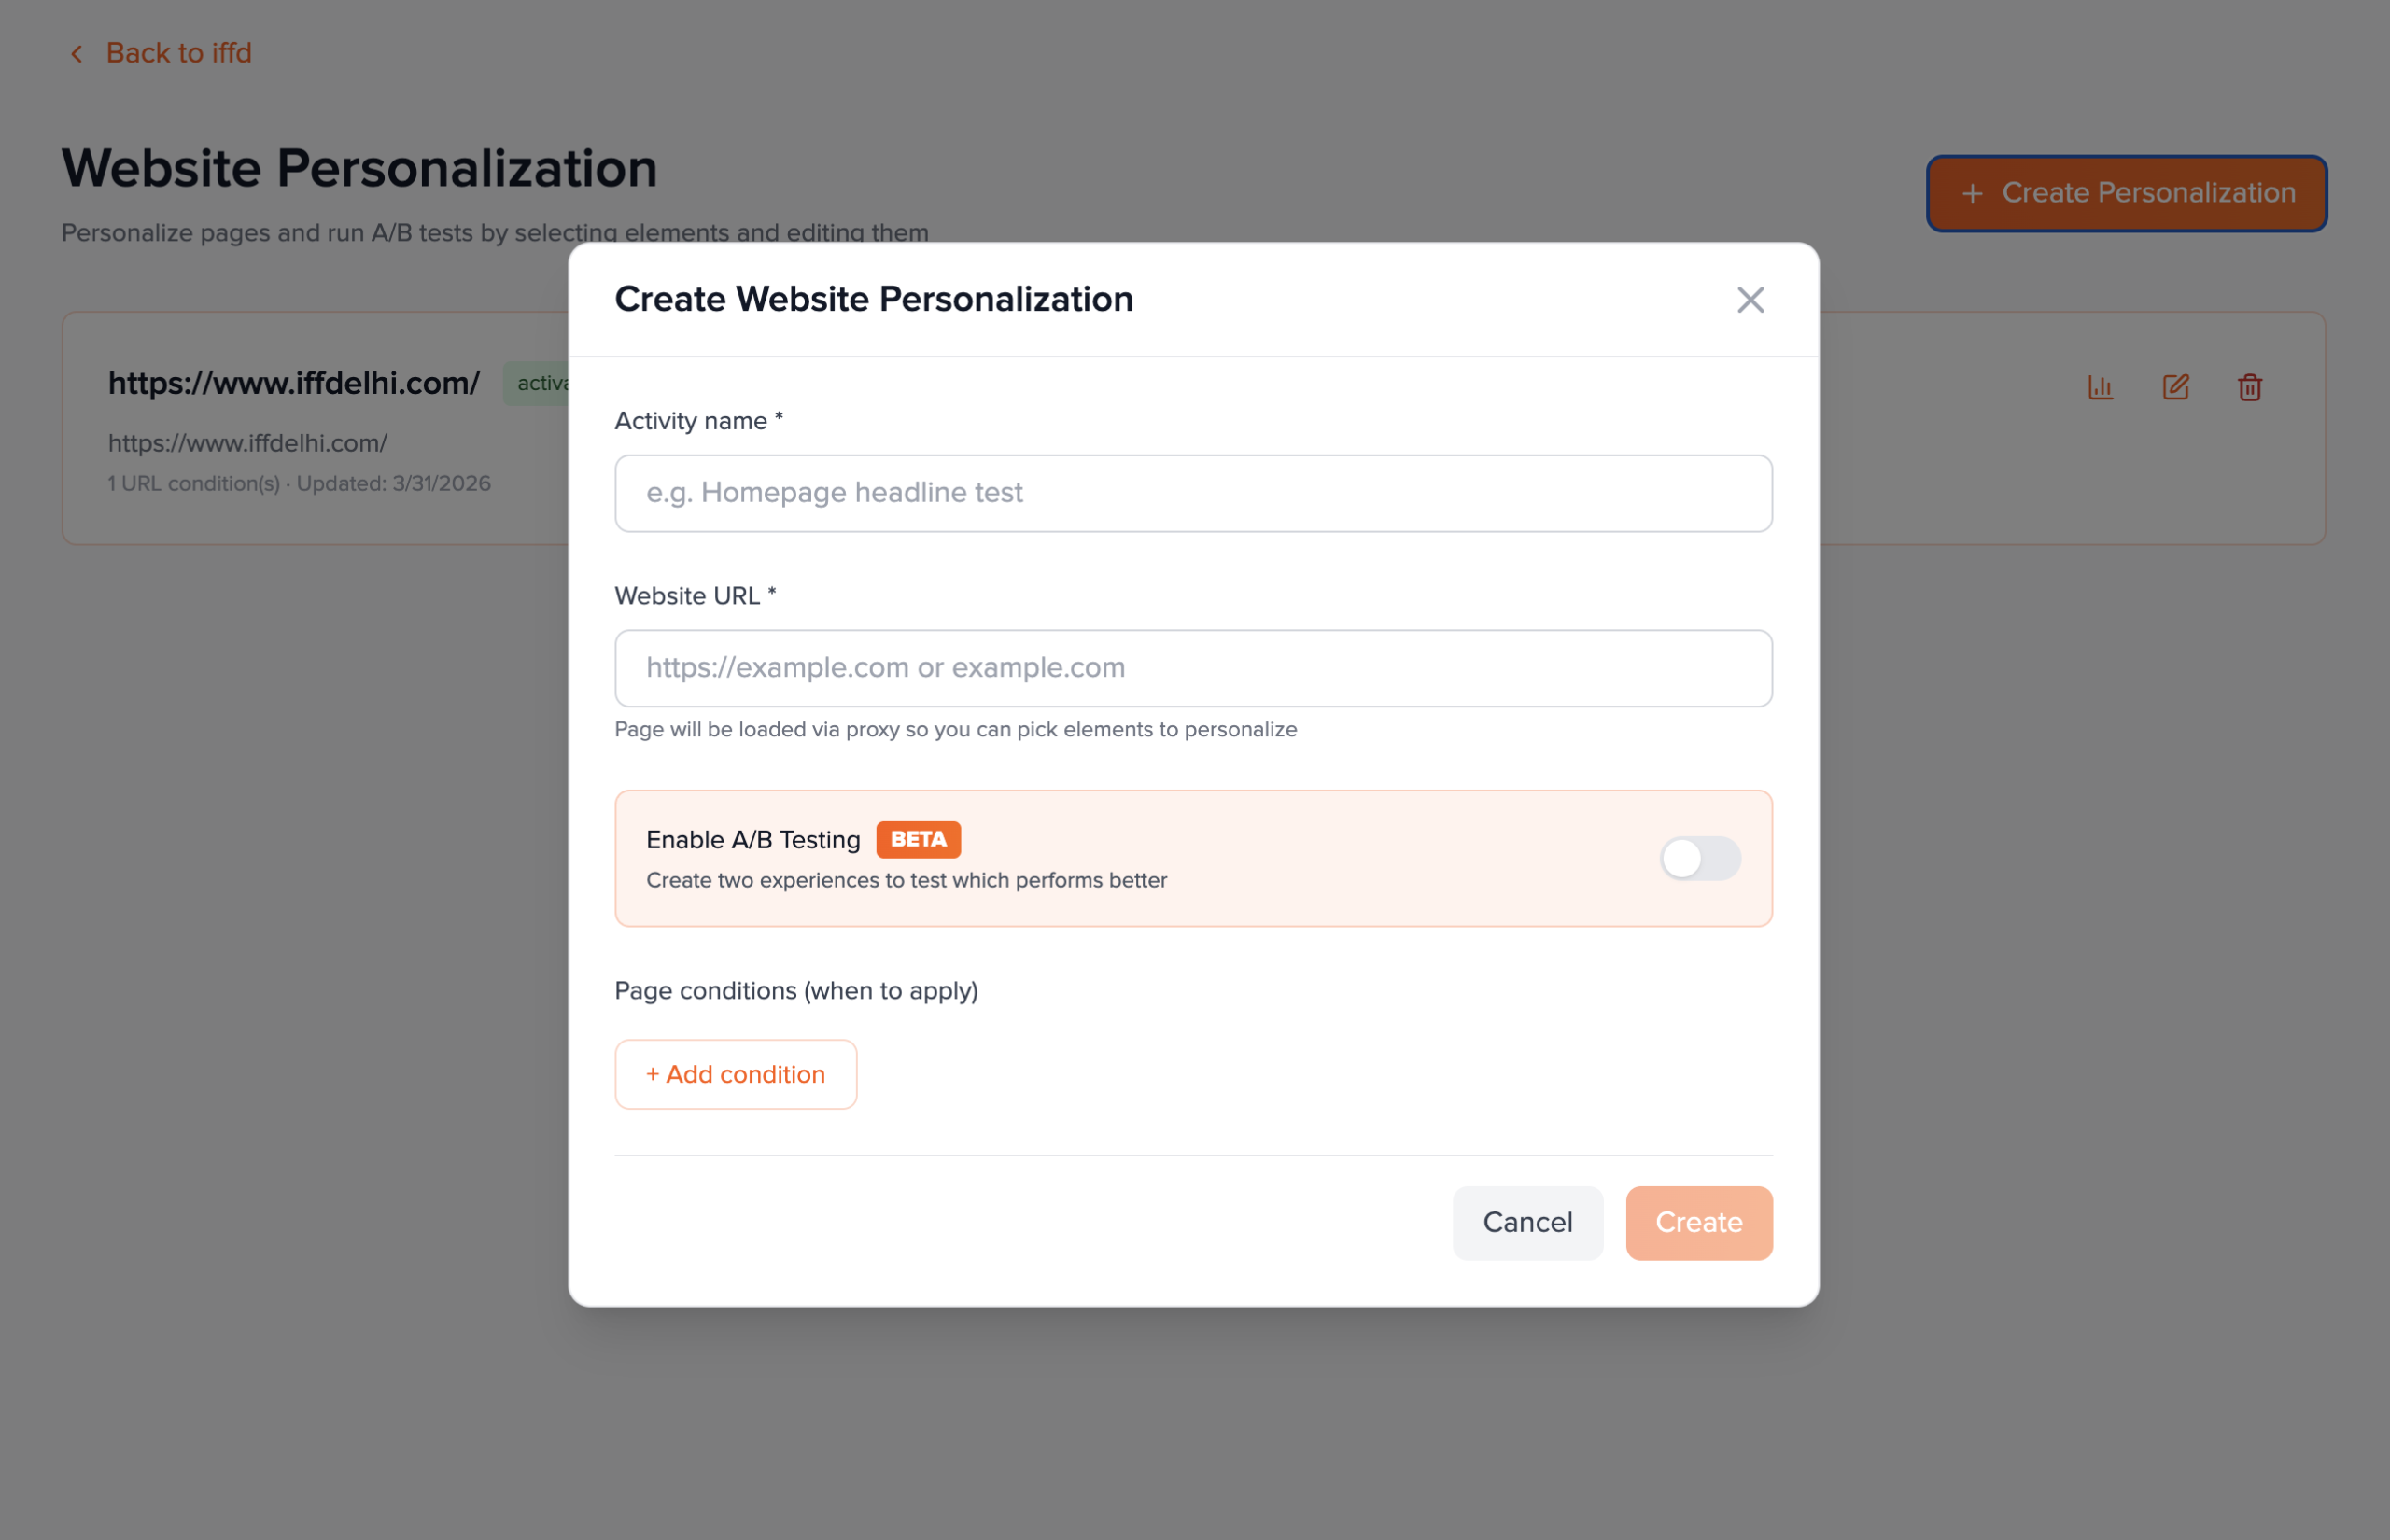
Step 3 — Enter the activity name
The first required field is Activity name *. This label is internal: it appears on the list cards, in the editor header, and on the metrics page.
- Use a name your team will recognize (e.g. "Pricing page — headline test March").
- Leading/trailing spaces are trimmed when you submit.
- If you leave it blank and click Create, you get an error toast: name and URL are required.
Step 4 — Enter the website URL
The second required field is Website URL *. Enter the page you intend to personalize in the visual editor (full URL or domain as supported by the input).
- Help text states the page will be loaded via proxy so you can select DOM elements—this is editor-only behavior.
- The same URL is saved on the activity; you can change it later next to Load in the editor.
- Example values:
https://www.example.com/pricing,https://example.com.
Step 5 — Optional: Enable A/B testing (beta)
When your workspace has the A/B beta flag enabled, a panel appears: Enable A/B Testing with a BETA badge and a toggle switch.
- Off (default): one experience at 100% traffic after create.
- On: the API receives
isABTest: true, two experiences at 50% / 50%, names "Experience A" and "Experience B", one marked control, andabTestStatus: running. - If this block does not appear, A/B is not enabled for your account—skip this step. See A/B testing for editor steps.
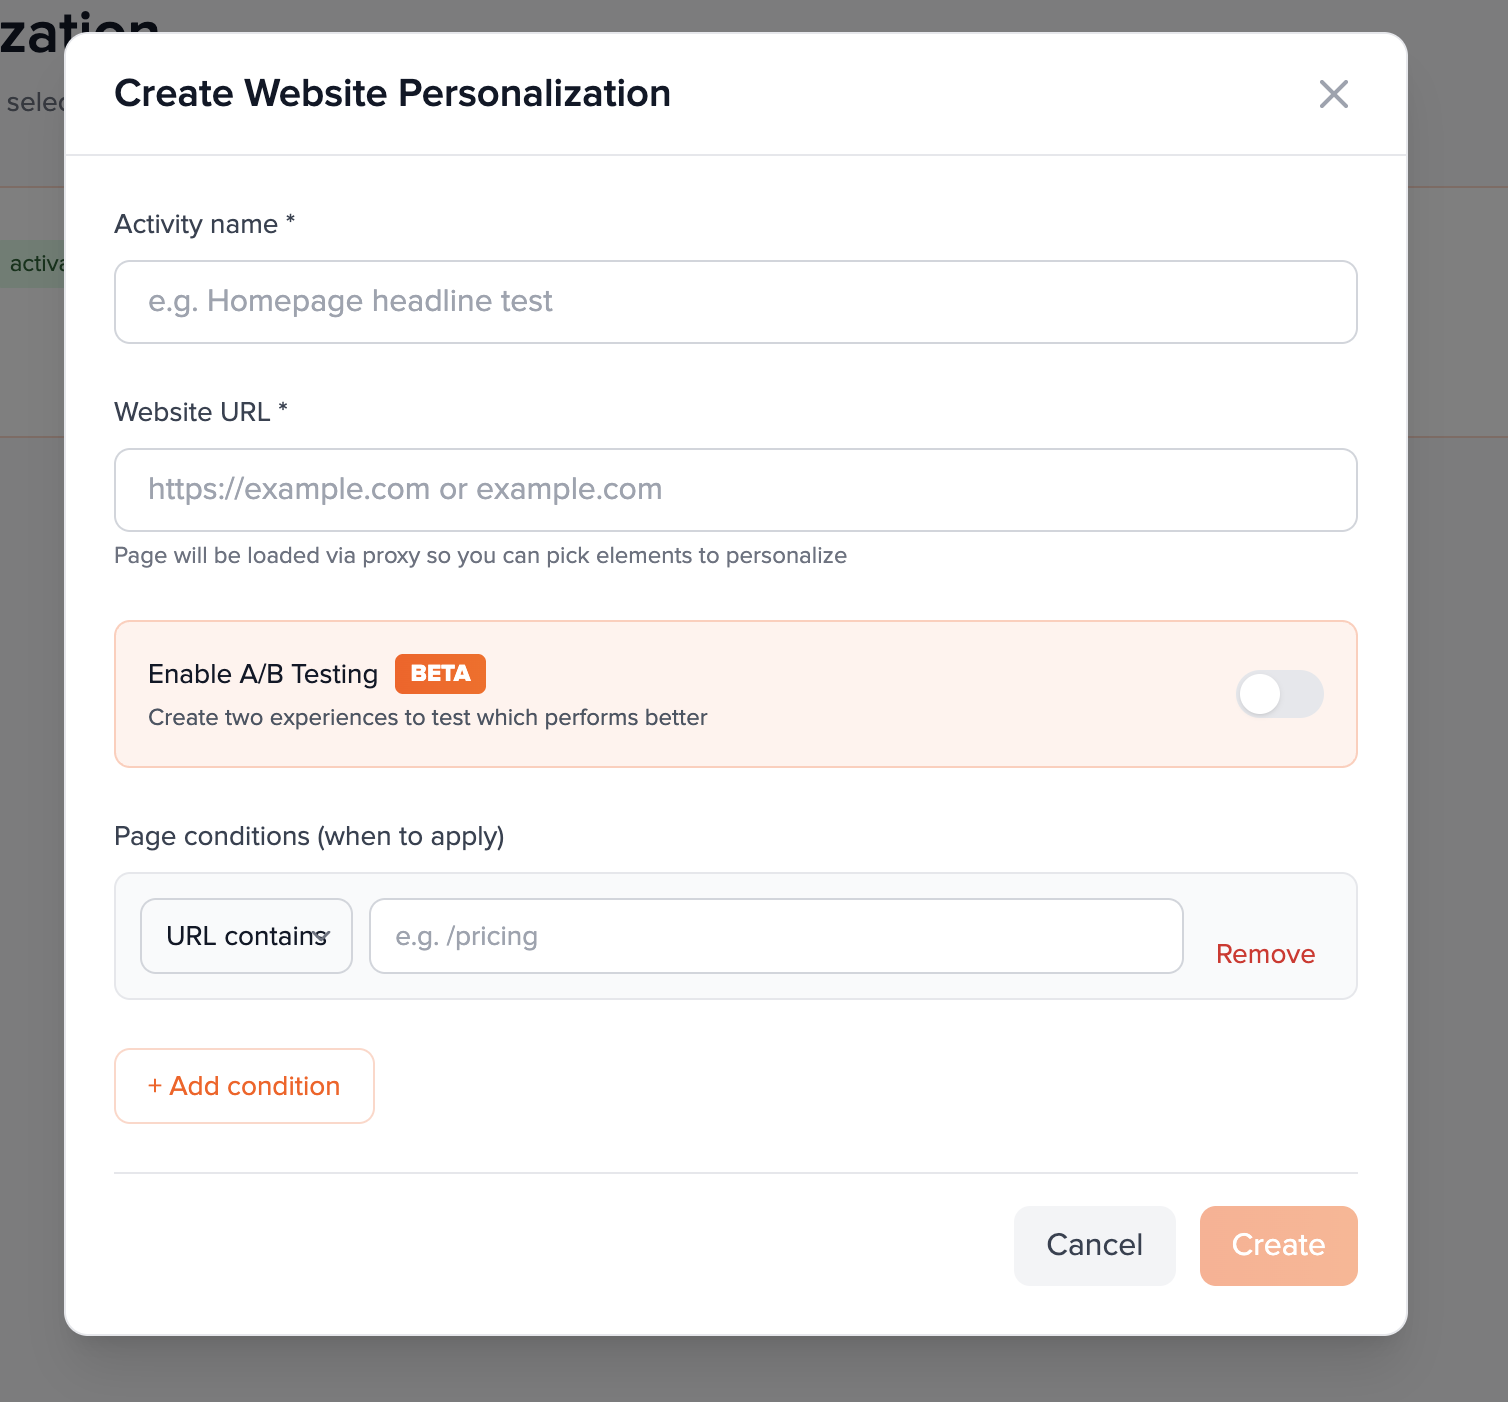
Step 6 — Optional: First page (URL) condition
Under Page conditions (when to apply), you can define where the activity is allowed to run. Start with + Add condition to insert a row.
- Each row has a type dropdown and usually a value field (except Landing page, which hides the value box).
- Types: URL contains, URL equals, Landing page, URL starts with, URL does not contain.
- Remove deletes that row. Conditions with empty values (except landing) are filtered out before save.
Step 7 — Optional: Multiple conditions and AND/OR
Add a second (or more) condition with + Add condition. Between consecutive rows, a control appears to choose AND or OR so you can express broader or stricter URL matching.
- OR — match if any listed condition passes (common for "/sale OR /deals").
- AND — all conditions must pass together (stricter routing).
- You can add more conditions later under Page delivery conditions in the editor (gear icon) with the same types.
Step 8 — Submit: Create
Review name and URL. Click Create (primary button). While the request runs, the label can show a loading state (e.g. "Creating…").
- The button stays disabled if name or URL is empty.
- On success: modal closes, the new activity is prepended to the list in memory, and the app navigates to
/personalization/[activityId]?projectId=.... - On failure: an alert shows the API error; you remain in the modal to fix inputs.
After creation — what you should see
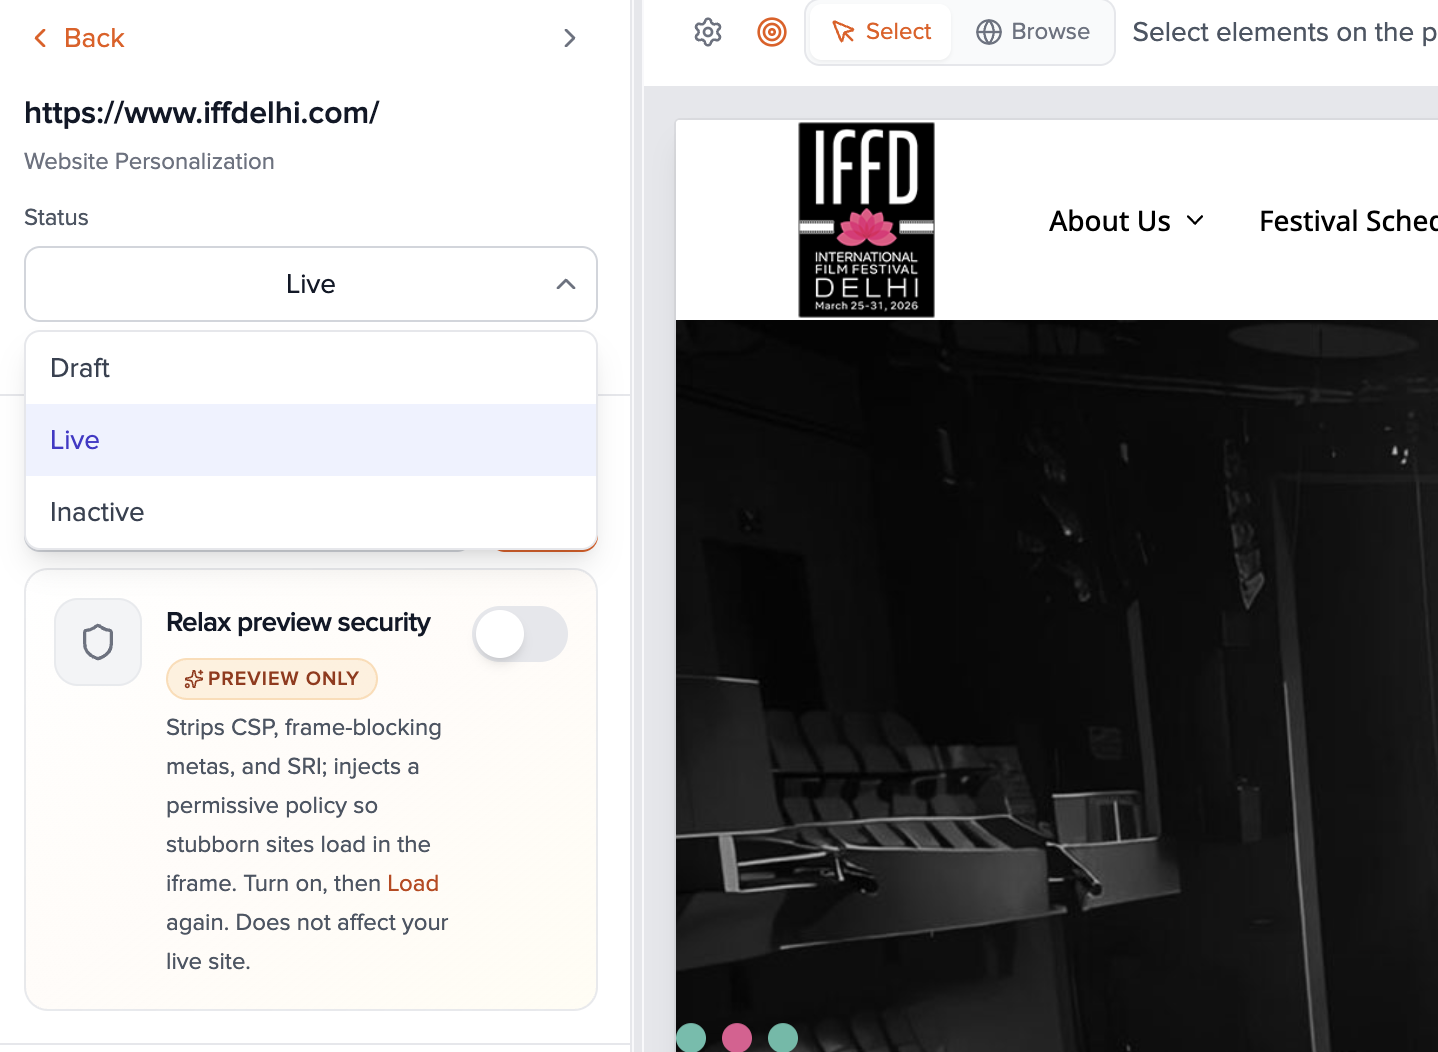
The activity editor loads. In the left sidebar you should see the activity title, Status defaulting to Draft, the Website URL field with Load, and (if A/B was enabled) an Experiences list with two rows and traffic percentages. The main area prompts you to enter/load the URL until HTML is fetched.
- Next: click Load, use Select mode, and add personalizations—see Build personalizations.
- Set status to Live only after you are ready for the SDK to deliver changes on your site.

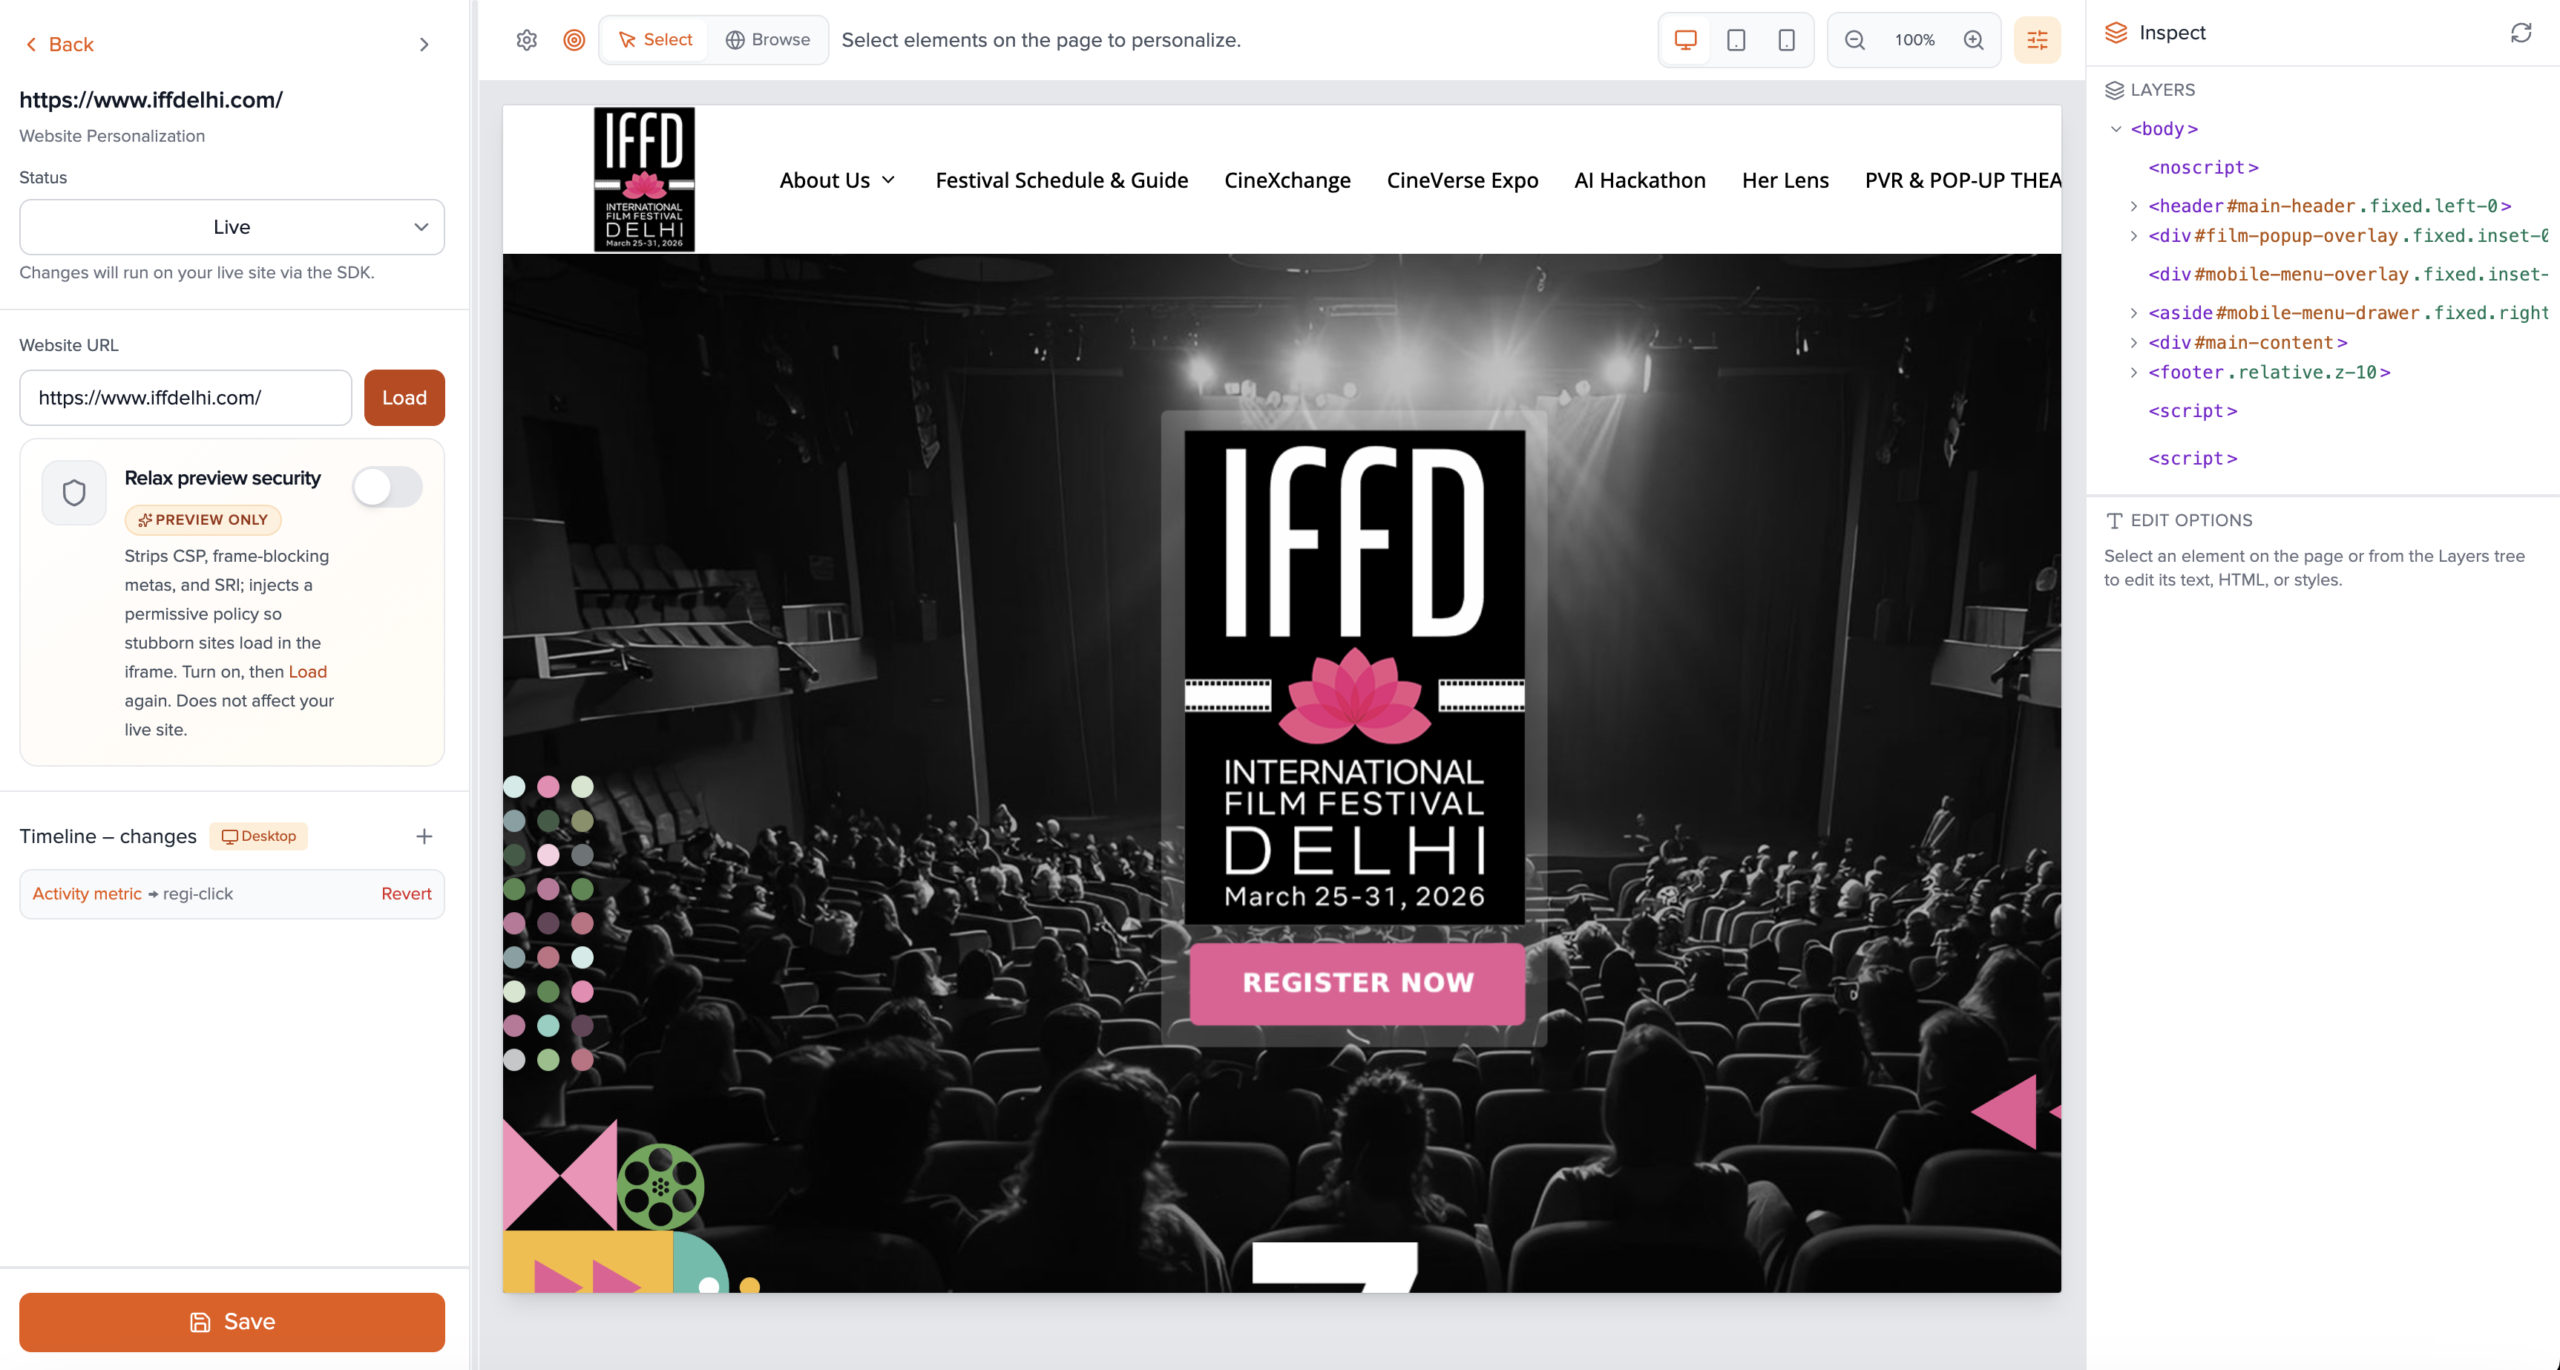
2. Build personalizations (detailed)
Everything below applies per experience. For a non-A/B activity there is one experience (100% traffic). Switch the active experience in the sidebar when running an A/B test.
Load the page in the preview
- In the sidebar, confirm or edit Website URL.
- Click Load. The app fetches HTML through the proxy and injects the element-picker into an iframe.
- If loading fails (CSP, frame blocking, etc.), enable Relax preview security in the sidebar—this only affects the editor preview, not your live site—then Load again.
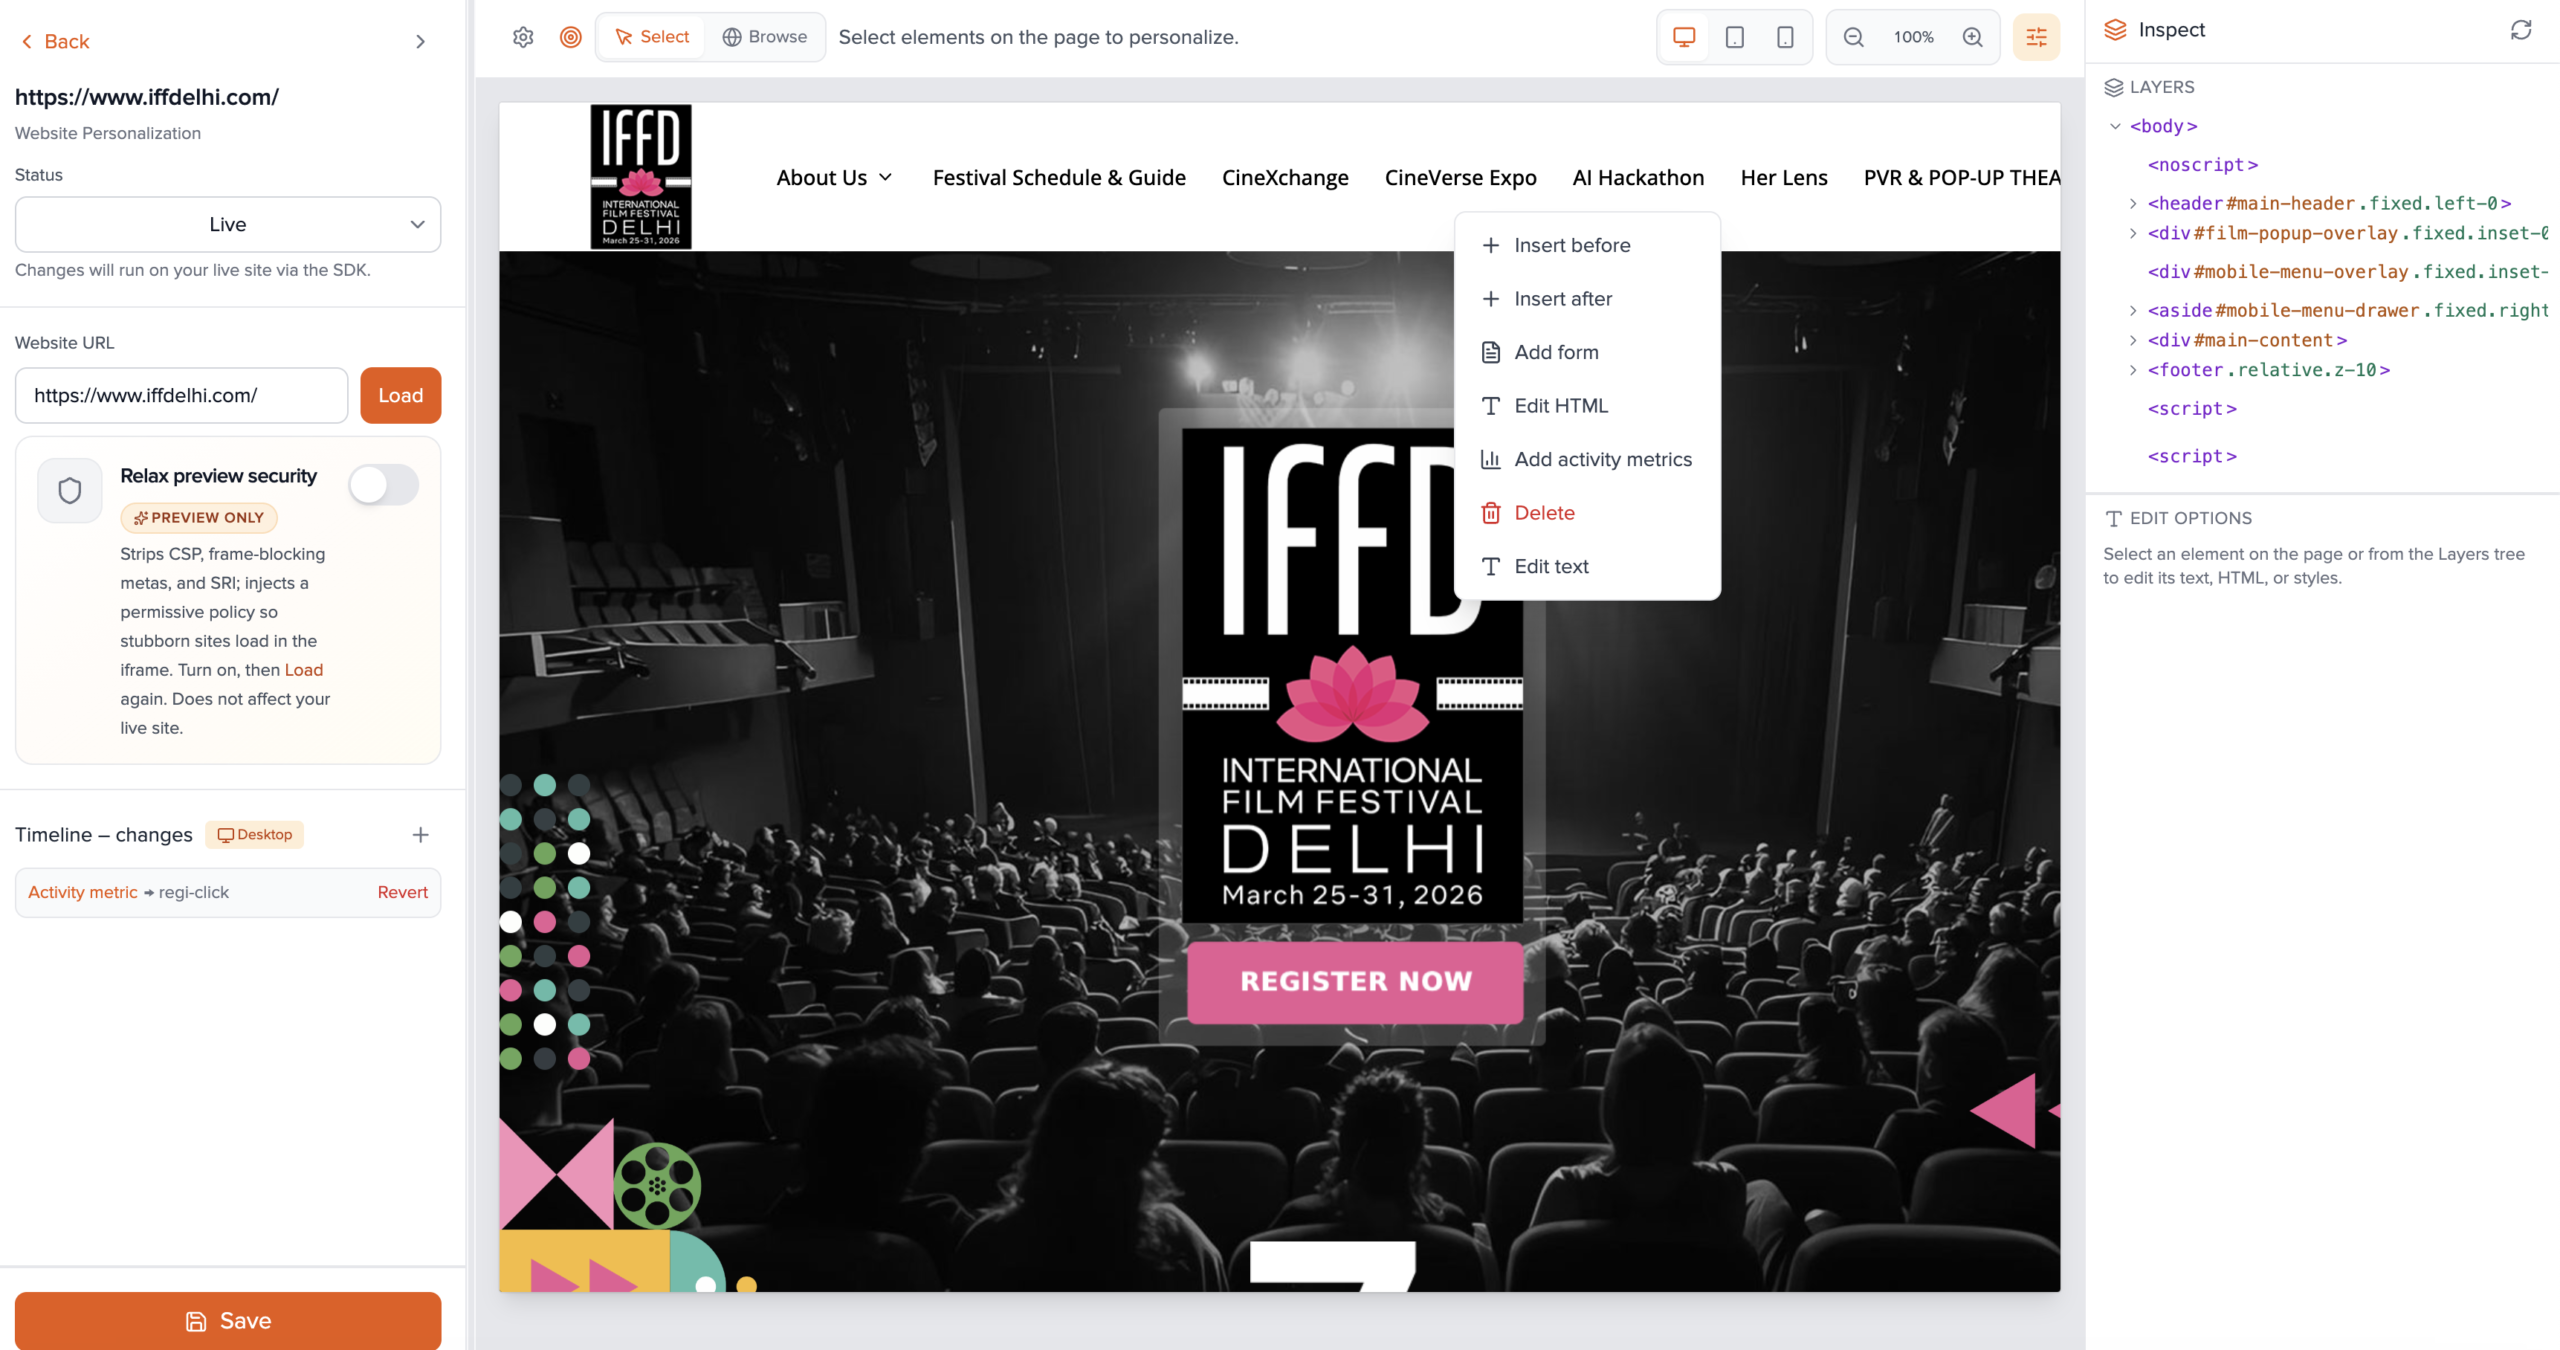
- Use the preview toolbar: Select mode to click elements to personalize; Browse mode to follow links and use the page normally. Switch back to Select to add more edits.
- Optional: Desktop / Tablet / Mobile breakpoints, zoom, and Inspect (sliders) adjust how you preview; changes can be tracked per device in the change list.
Select elements and edit content
- With the page loaded and Select active, click an element. The UI opens controls for that selector.
- Supported change types (stored per experience) include: text, HTML, replace HTML, CSS (property + value), attribute (name + value), hide, and show. Apply or save per the inline actions so the timeline records the edit.
- You can add a friendly display name for the selector to recognize it in the timeline.
- Repeat for every element you want to change in this experience. Order appears in the sidebar timeline; you can revert individual steps where supported.
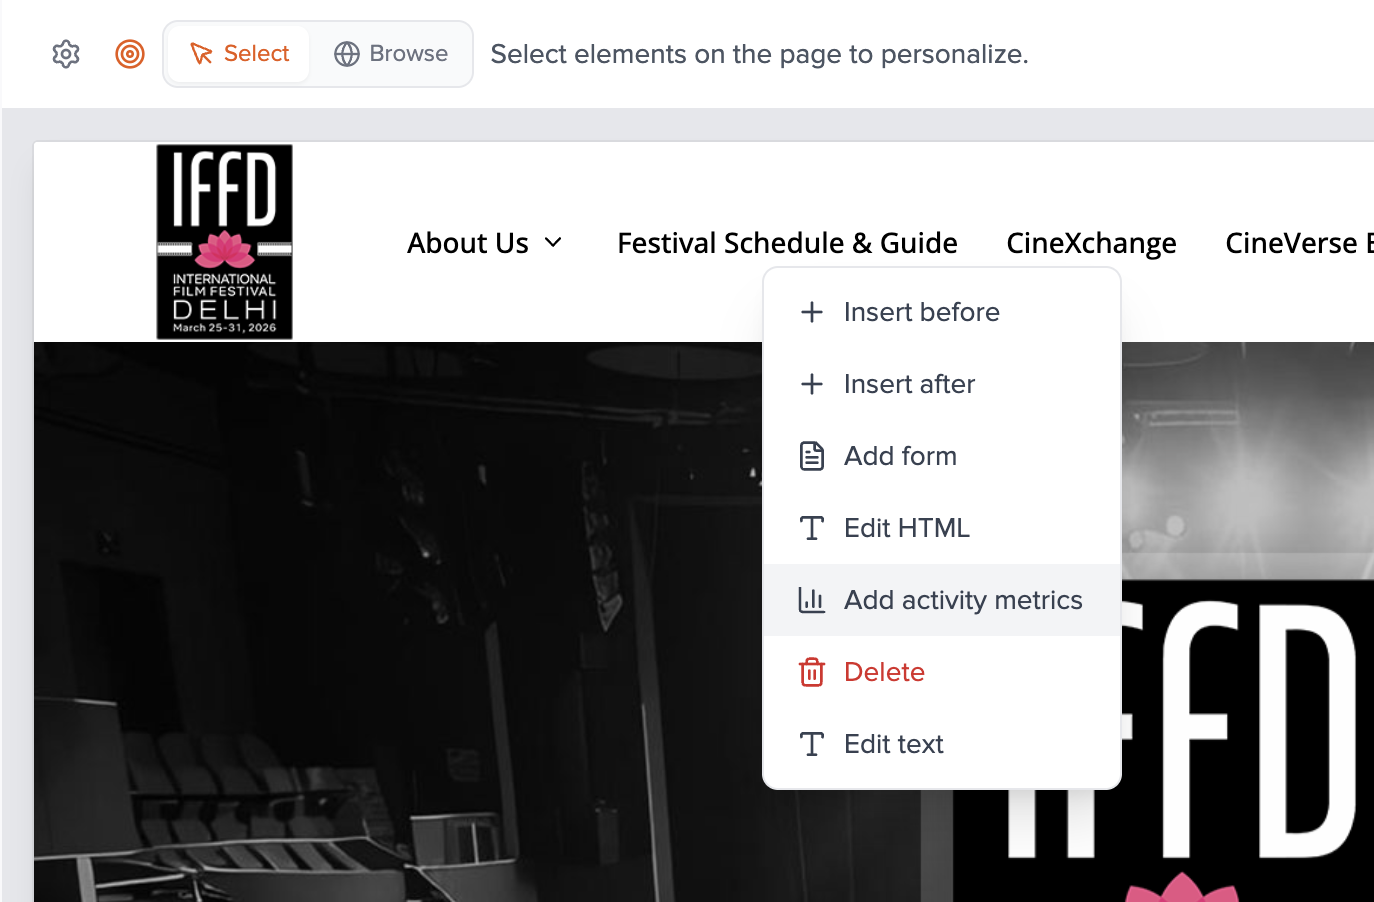
Insertions, context menu, and removals
- Right-click an element in the preview to open a context menu: options include Insert before and Insert after to add HTML blocks (and structured components where offered) relative to that node.
- Insertions are saved on the current experience with position (
before/after), selector, and HTML content. - Elements you remove in the editor are tracked as removals (selectors) so the live SDK can hide/delete them consistently on load.
Custom code, forms, and profile placeholders
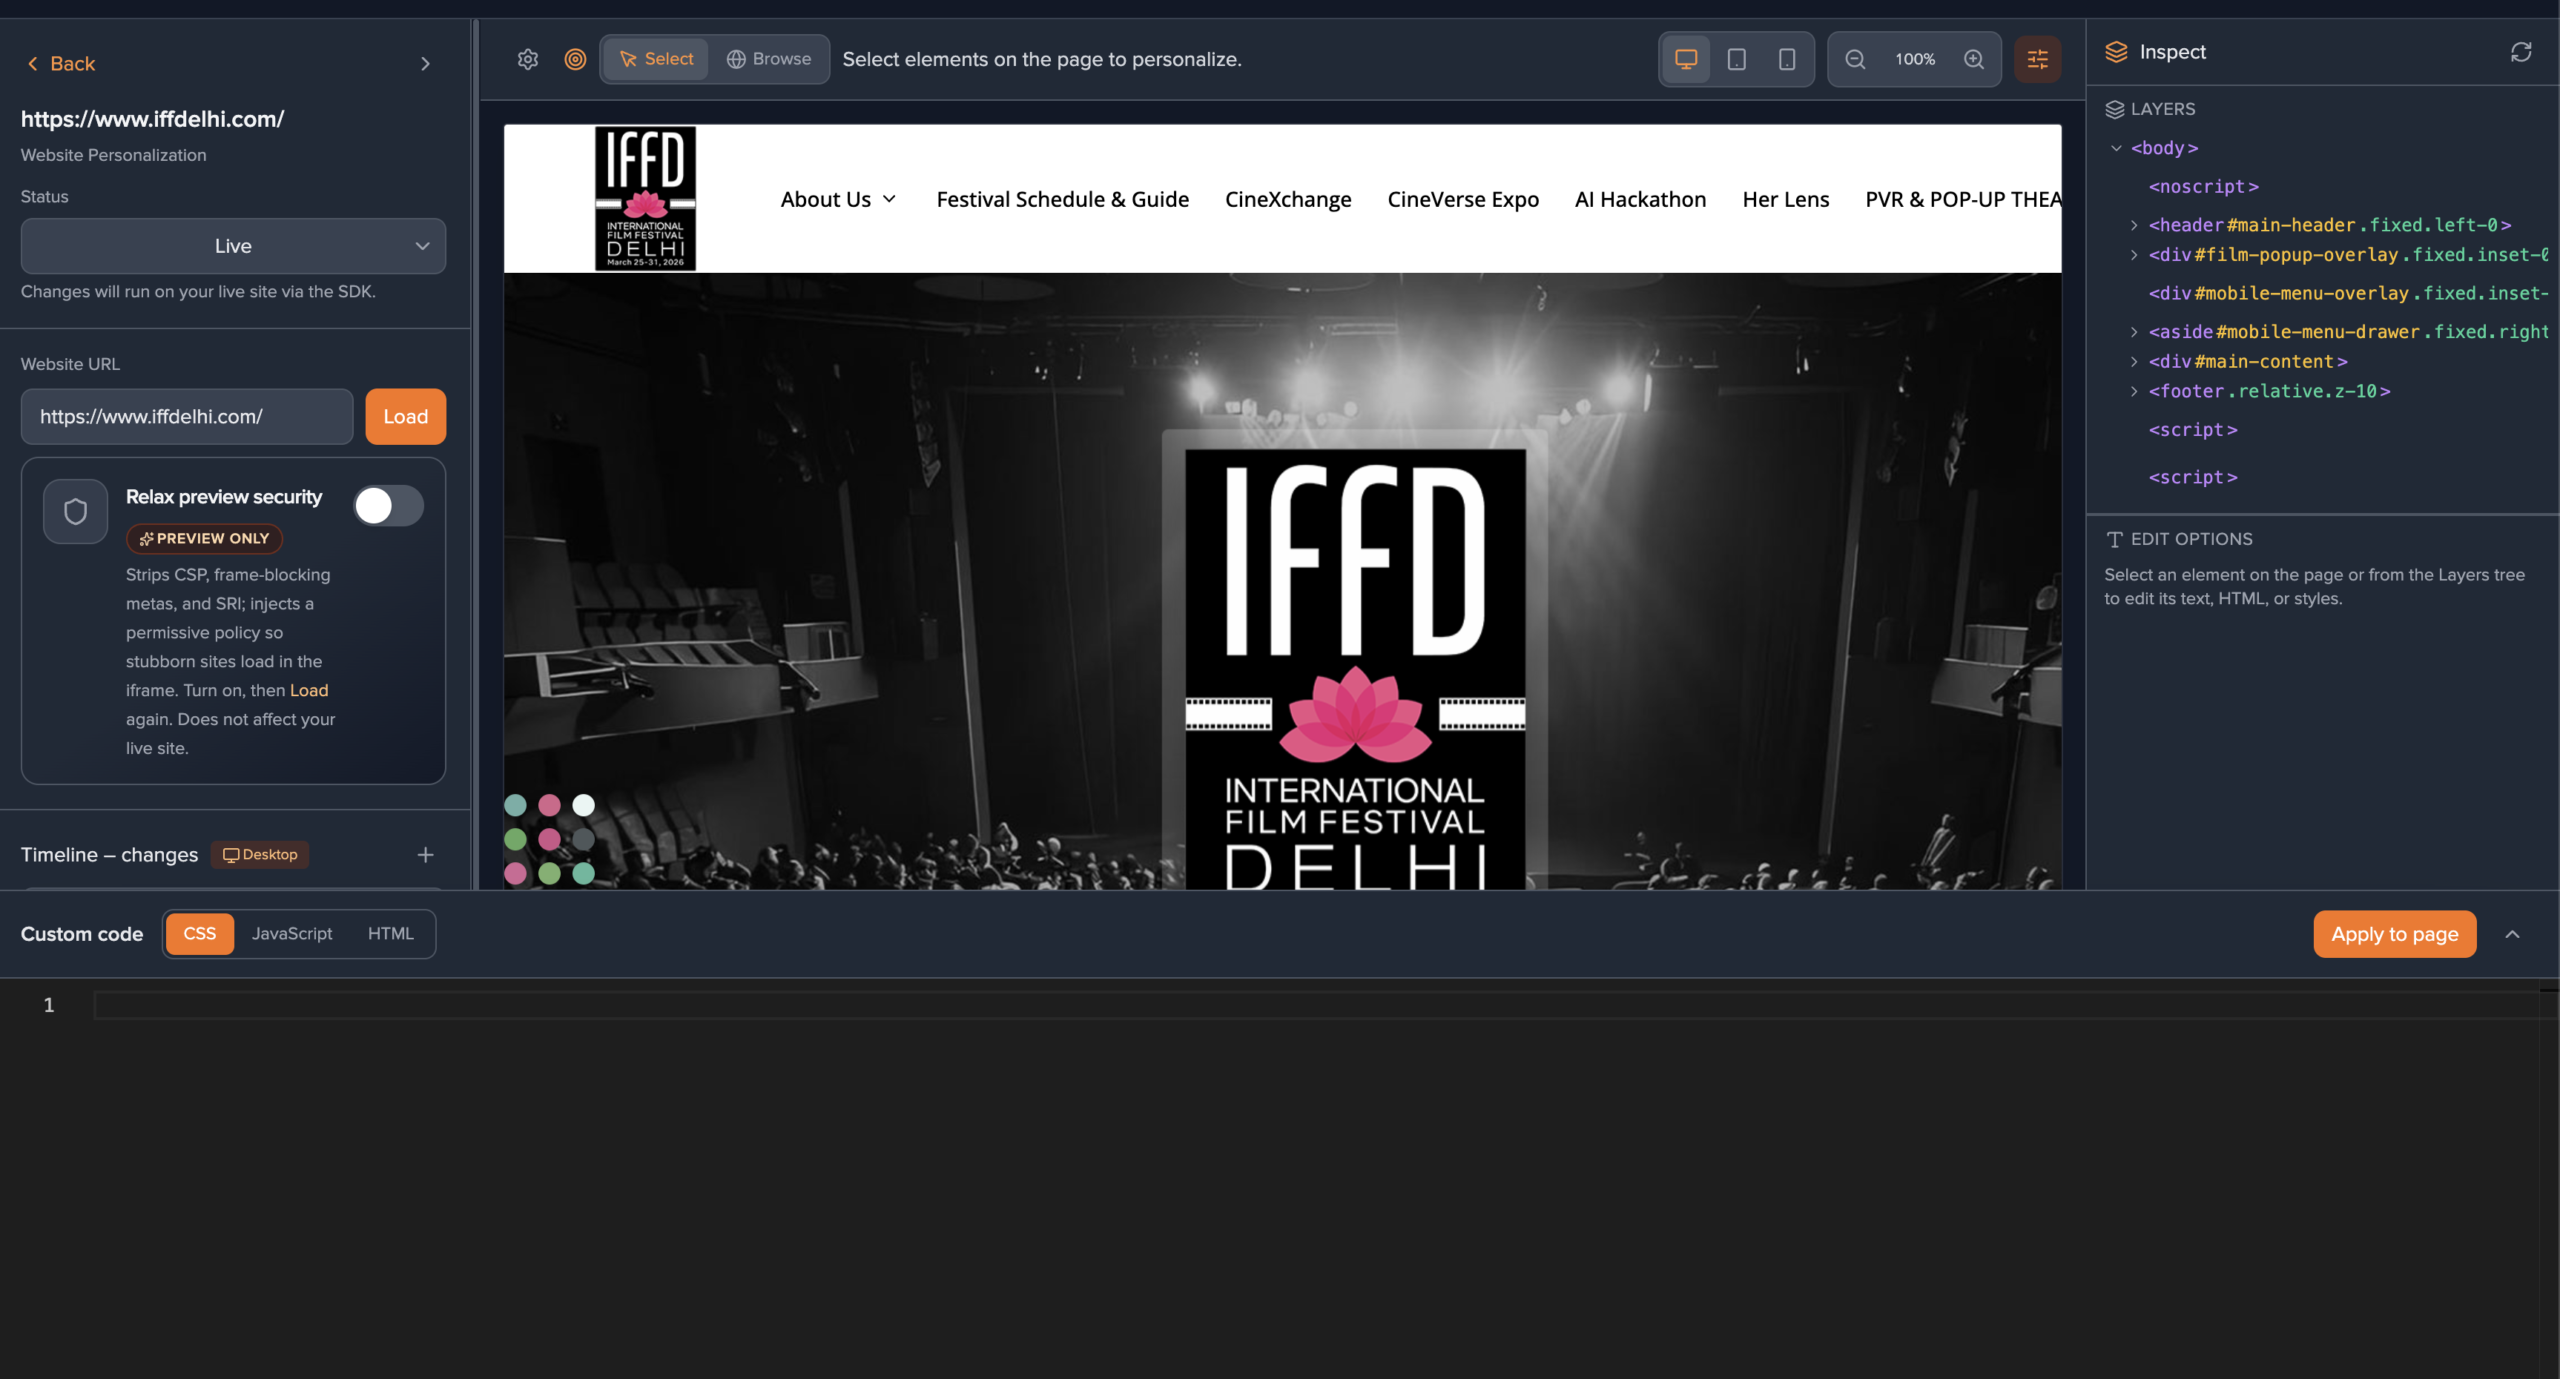
- Open Custom code from the editor (slide-up panel) to add global CSS, JavaScript, and optional HTML for the activity. HTML injection position (e.g. body start vs end) is configurable.
- Custom JS may call Przio APIs such as GET /api/sdk/visitor-profile (CORS-enabled) to personalize using visitor or stitched profile data—configure keys in project settings as documented for your deployment.
- Form insertions can receive style overrides (buttons, wrapper, labels, inputs) per form container selector.
- Editor preview can resolve profile placeholders using a sample visitor id when enabled—useful to preview dynamic snippets before go-live.
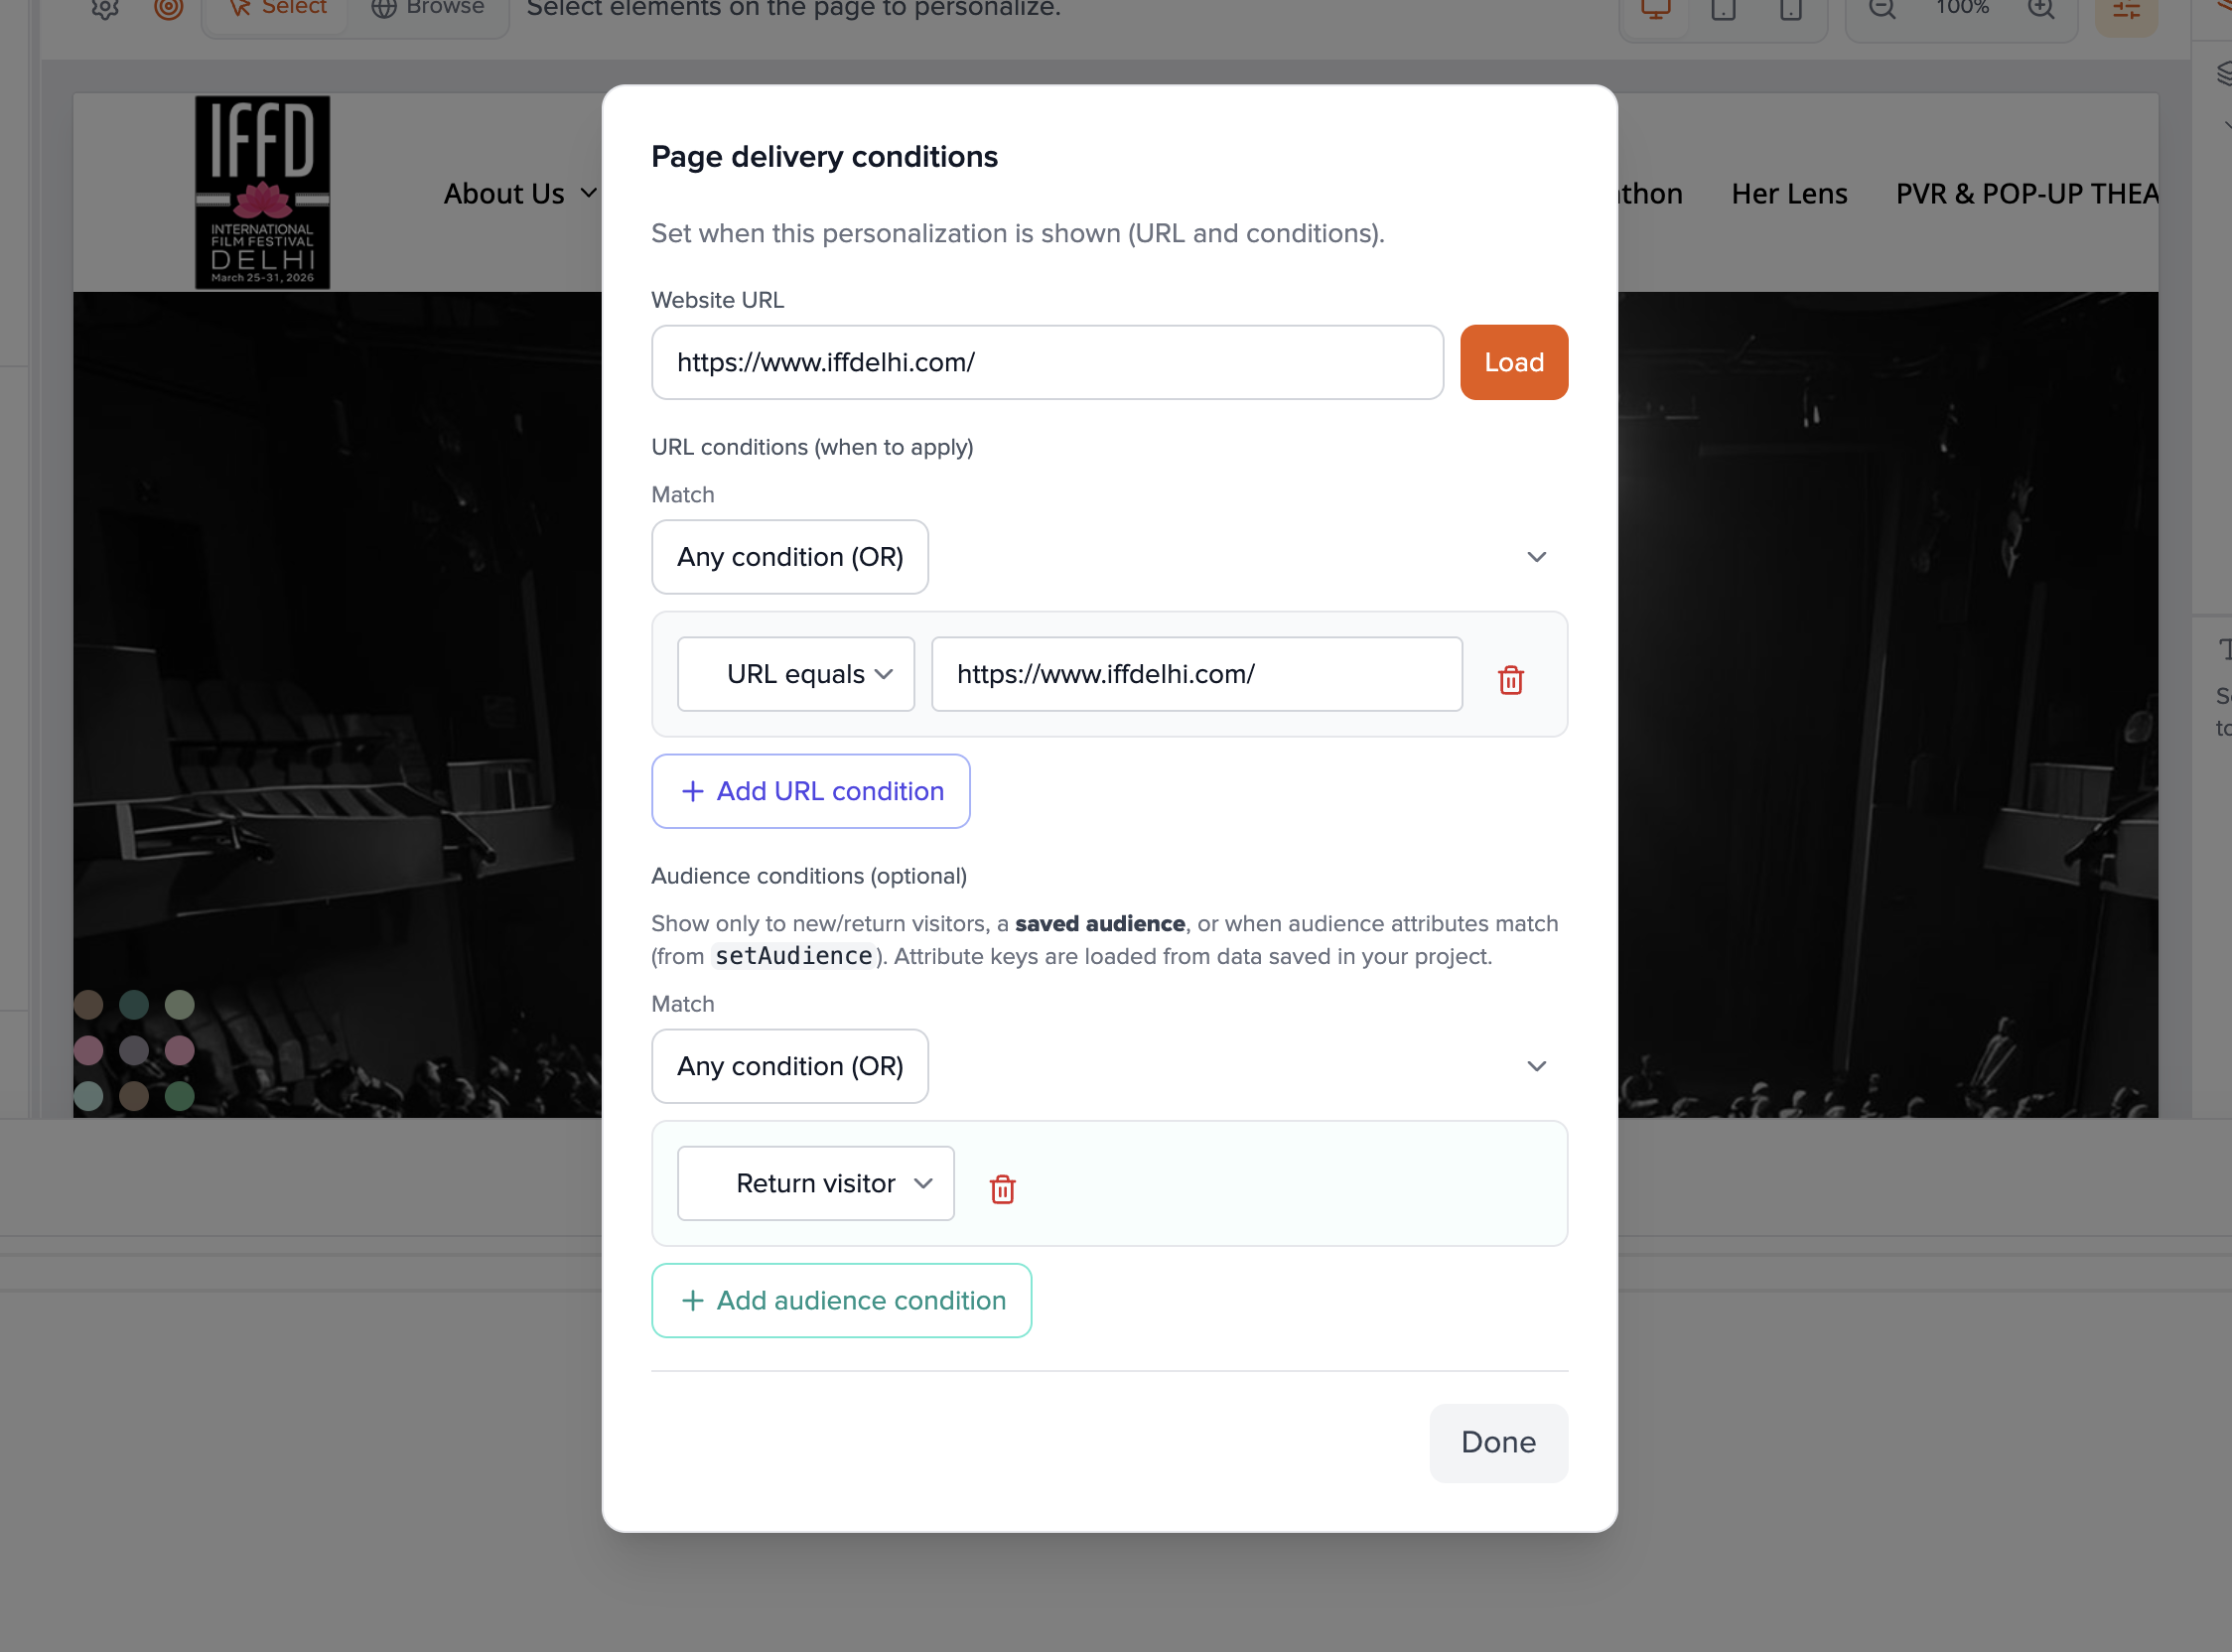
URL conditions & audience targeting
Targeting is edited in the Page delivery conditions flow (gear icon in the preview toolbar opens the same settings as the scrollable block in the sidebar).
- URL conditions — Same types as at create time (contains, equals, landing, starts with, does not contain). Add rows with Add URL condition; set AND/OR between groups as needed. The live SDK matches the visitor's current URL against these rules.
- Audience conditions (optional) — Narrow who sees the activity:
- New visitor / Return visitor
- Saved audience — pick a segment from Audience Manager.
- Custom (setAudience) — match keys and values set via
PrzioSDK.setAudience(operators such as equals, contains, exists, etc., depending on UI).
Save and publish
- Click Save at the bottom of the sidebar. A confirmation nudge appears when the save succeeds.
- For A/B activities, every experience's traffic % must sum to 100 or save is blocked with an explanation—adjust percentages in the Experiences section.
- Set Status to Live when you want the SDK to apply this activity on your site. Draft keeps it in the dashboard only. Inactive turns off delivery for everyone.
- Help text under the status dropdown reminds you: Live changes run via the SDK; Inactive stops the activity.
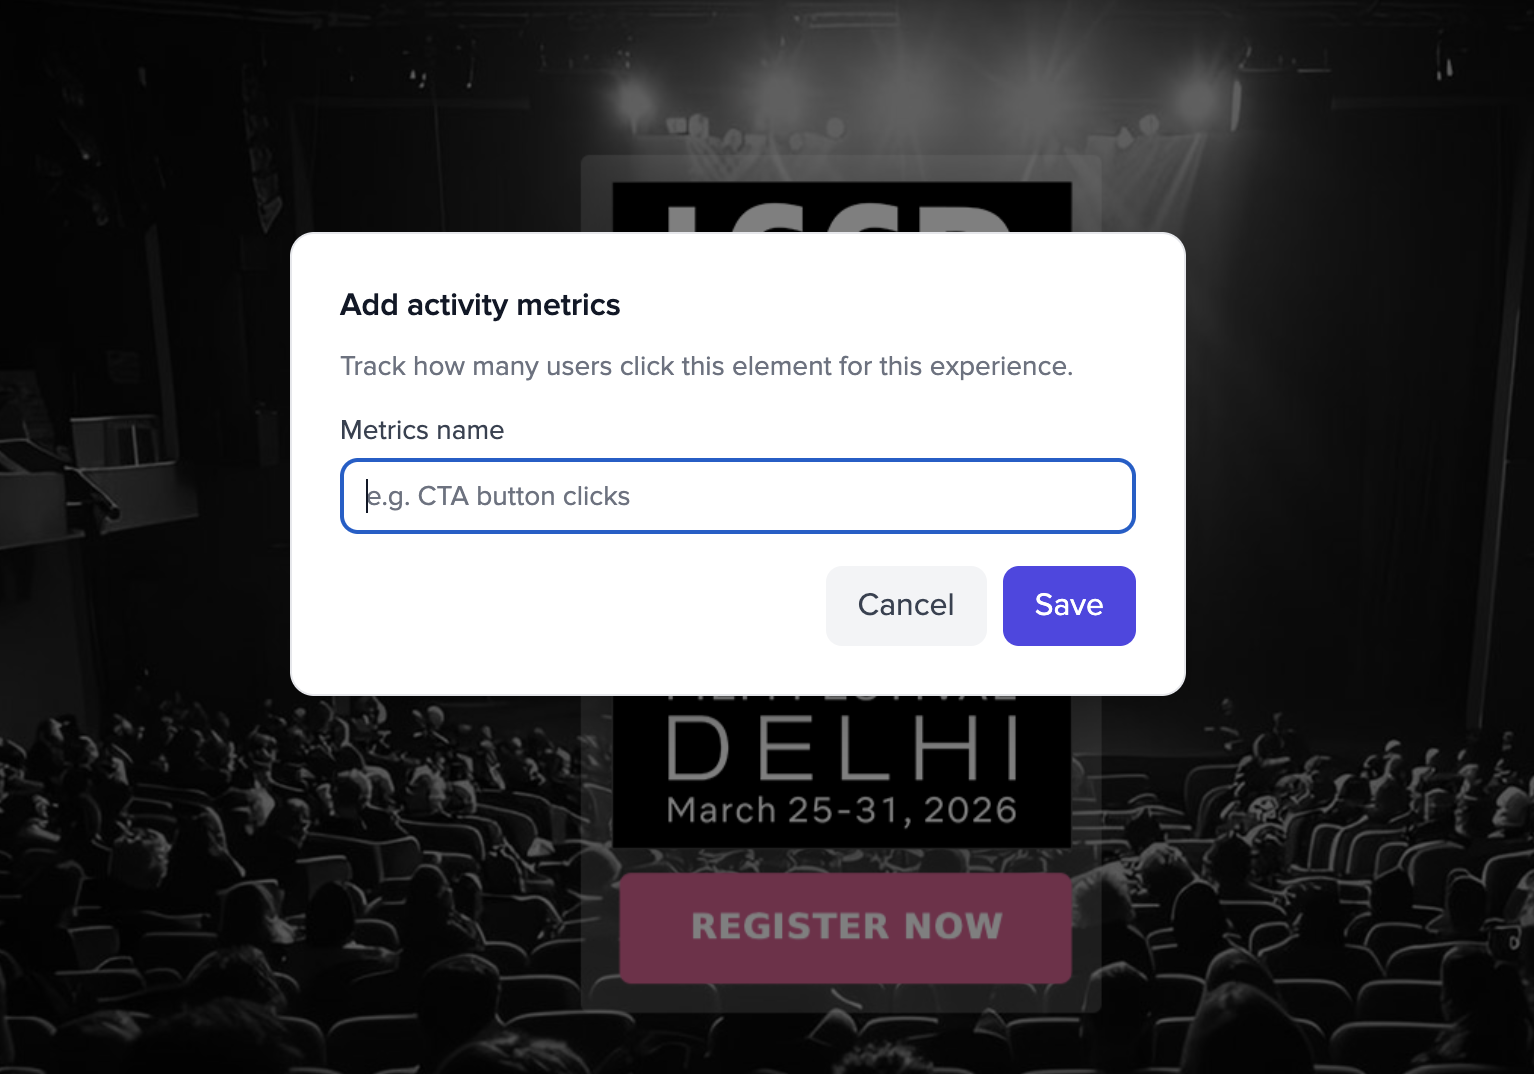
Attach activity metrics (for the metrics dashboard)
- In the preview context menu (or equivalent control), choose Add activity metrics.
- Select the element(s) to track and give each metric a name (shown in reports).
- Clicks on those elements are sent to Przio after you publish; views are recorded when a visitor actually receives the experience on a matching page.
3. A/B testing activity (detailed)
At creation
The Enable A/B Testing option appears only when A/B testing is enabled for your workspace (beta flag). Without it, create a standard activity and use a single experience at 100%.
- In the create modal, turn Enable A/B Testing on. Two experiences are created automatically: default names, 50% traffic each, one marked Control (flag icon).
- Click Create. The editor opens; the sidebar lists both experiences.
In the editor
- Select an experience — Click a row in the Experiences list to make it active. The preview reloads for that variant when a URL is set; personalizations are independent per experience.
- Rename — Use the pencil icon on an experience name.
- Traffic split — Edit the percentage next to "Traffic:" for each row. All experiences must total 100% before Save succeeds.
- Control — Click the flag on an experience to mark it as the control variant (for your own analysis discipline).
- Reorder — Drag the grip handle to reorder experiences in the list.
- Add experience — Use Add experience when you need more than two variants (e.g. three-way test). Each new variant starts with its own empty personalization set until you edit it.
- You cannot remove experiences below two while A/B mode is on (the UI enforces a minimum of two for a test).
- Configure URL and audience conditions once per activity—they apply before the SDK picks an experience by traffic allocation.
The Activity metrics page rolls up all experiences on the activity (combined views and clicks). Use parallel metric setups per variant and the recent-events list to reason about A/B performance, or separate activities if you need isolated reporting per variant.
4. View metrics (detailed)
Open the metrics page
- From Website Personalization, find the activity card.
- Click the chart / metrics icon (bar chart). The route is
/personalization/[activityId]/metrics?projectId=.... - Alternatively, open the editor in another tab and use the list link; there is no separate in-editor metrics tab—the list icon is the primary entry from the dashboard.
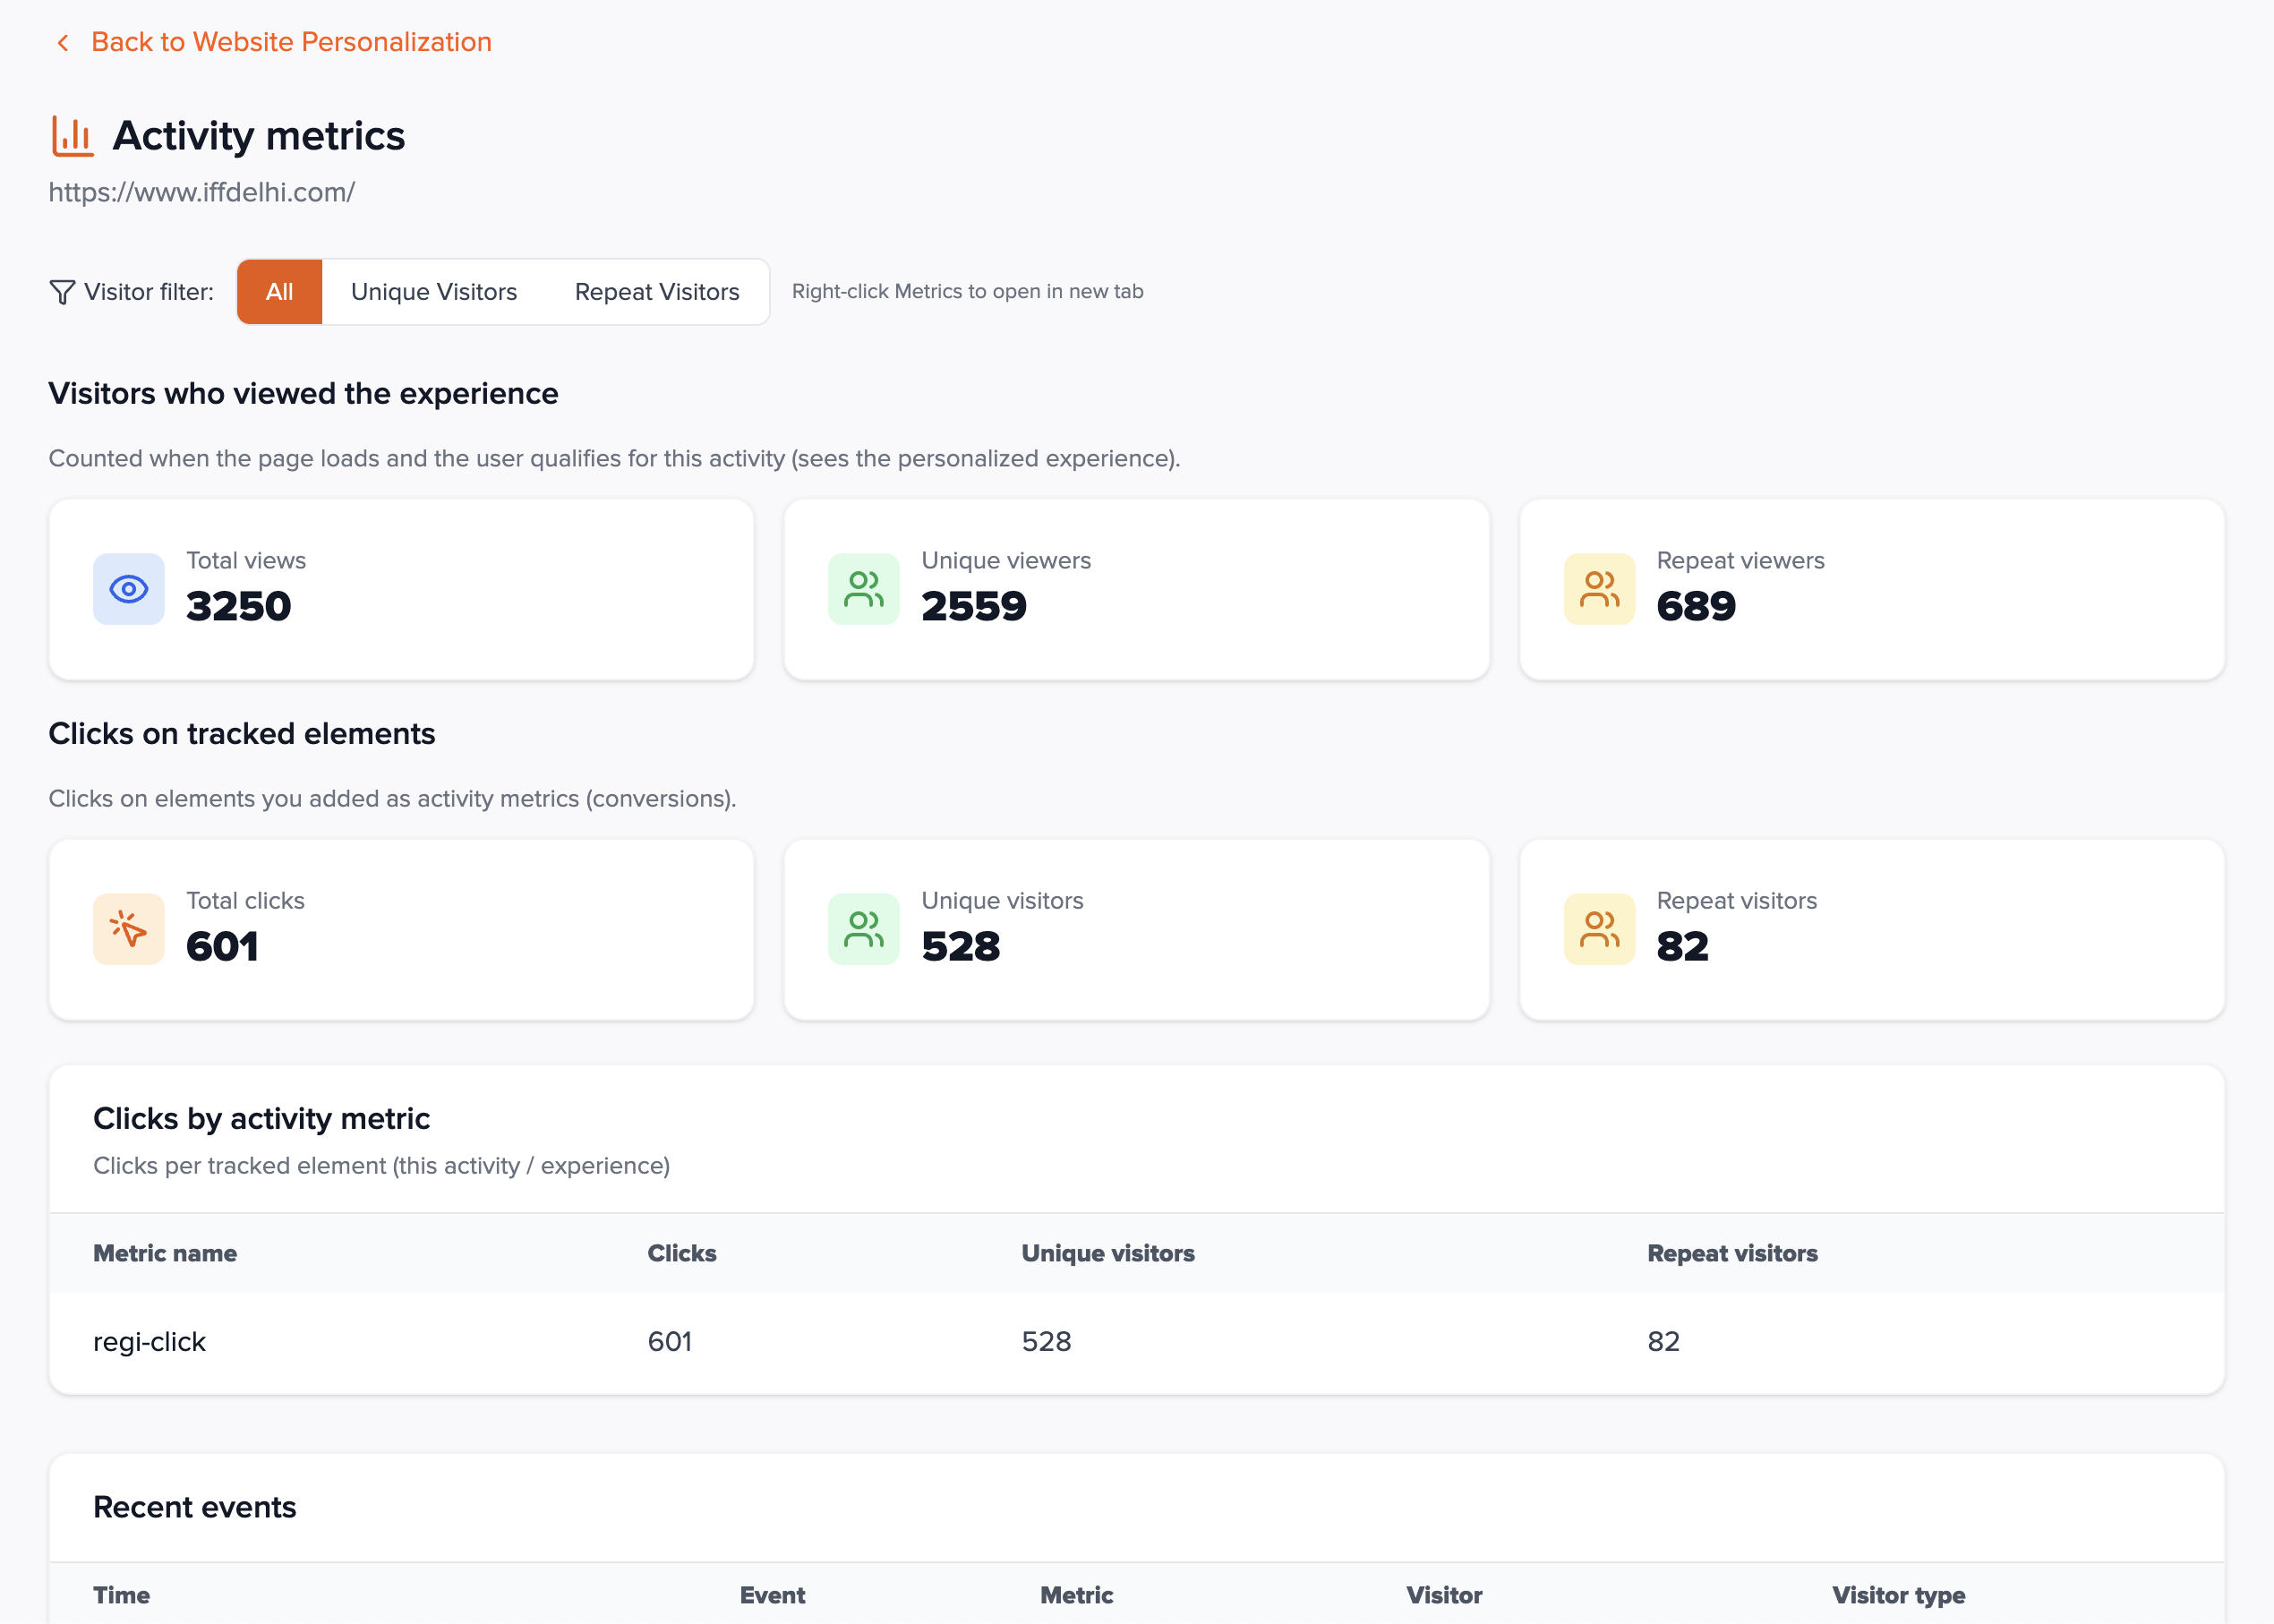
Read the dashboards
The page title is Activity metrics; the subtitle shows the activity name.
Visitor filter (toolbar)
- All — no filter.
- Unique visitors — first-time interactions in the reporting window (per API semantics).
- Repeat visitors — returning visitors.
The UI notes you can right-click the metrics entry to open in a new tab.
Visitors who viewed the experience
- Total views — counted when the page loads and the visitor qualifies for the activity (sees the personalized experience).
- Unique viewers / Repeat viewers — breakdown of view events.
Clicks on tracked elements
- Total clicks — all click events on elements you configured as activity metrics.
- Unique visitors / Repeat visitors — visitors who clicked any tracked element.
Clicks by activity metric
Table columns: Metric name, Clicks, Unique visitors, Repeat visitors per tracked element. If nothing appears, add metrics in the editor, set the activity Live, and wait for production traffic.
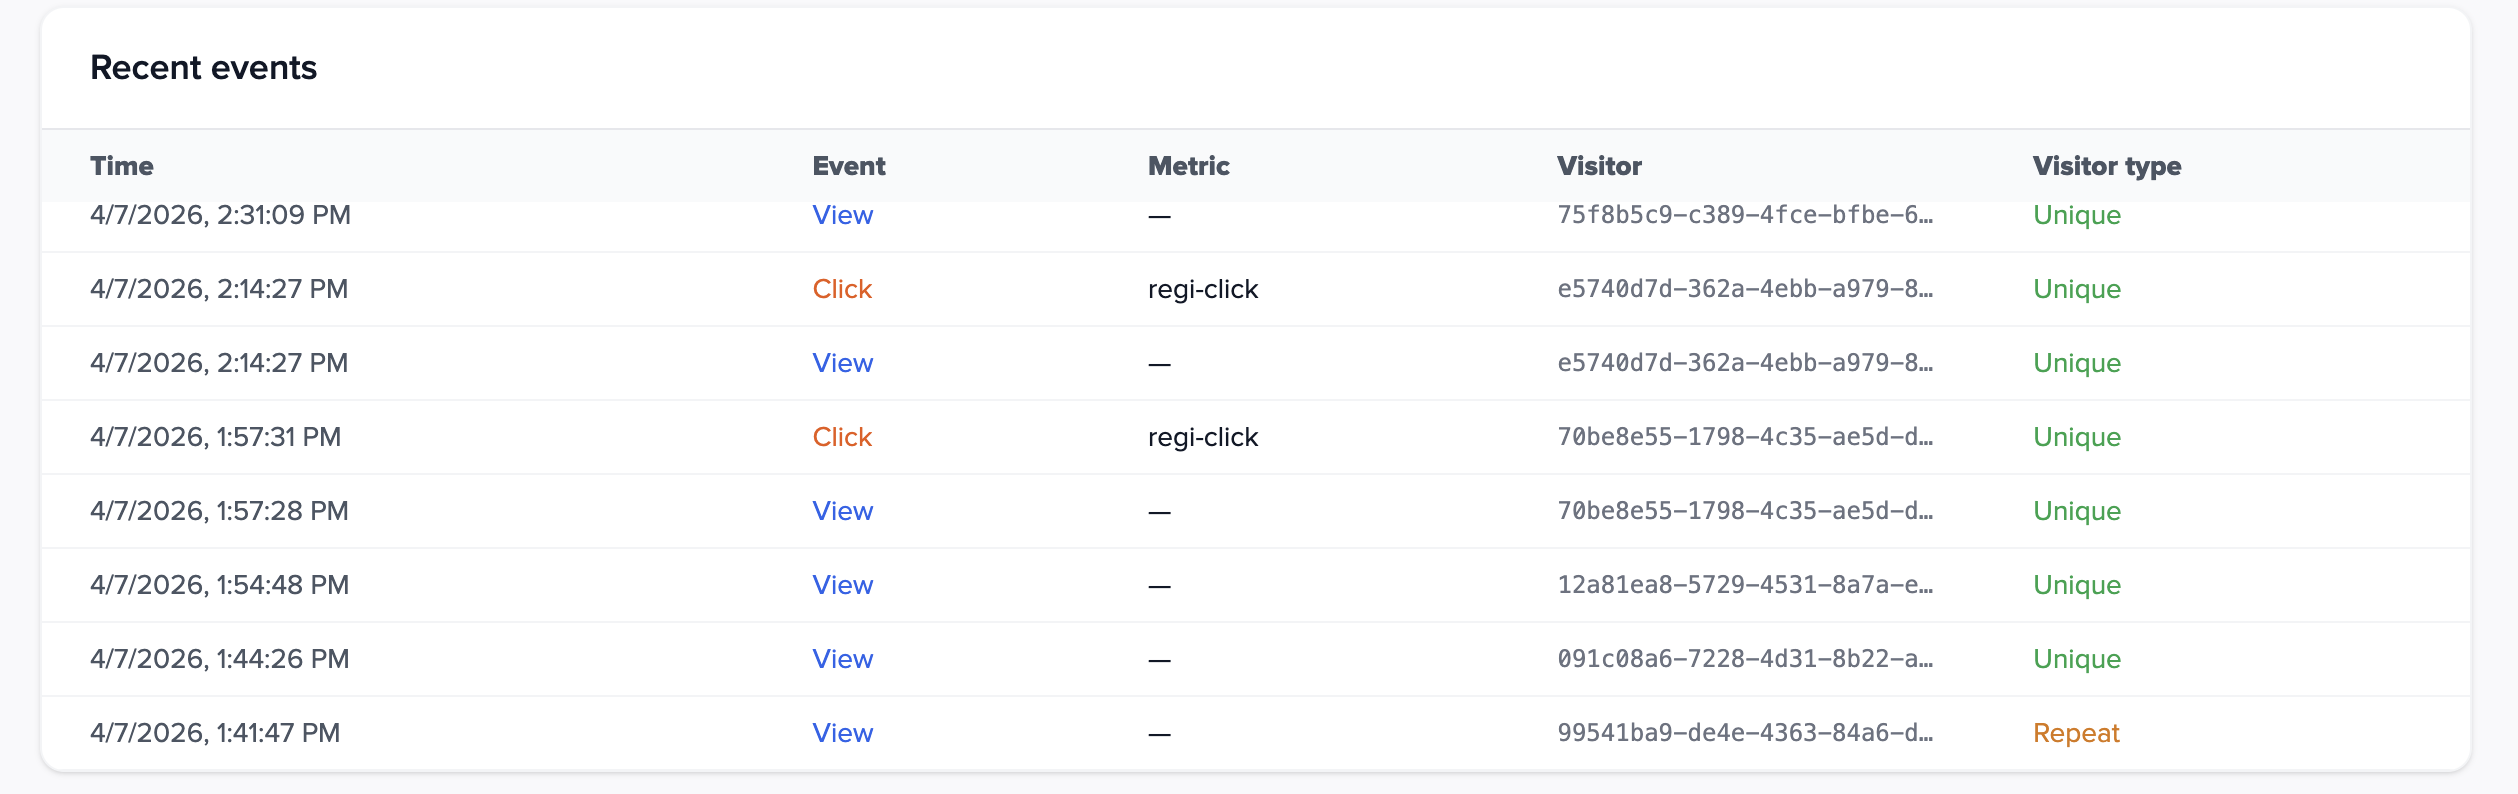
Recent events
When data exists, a table lists recent rows: time, event type (View or Click), metric name (for clicks), visitor id, and visitor type (Unique vs Repeat). Useful for sanity checks after a deployment.
How it works for visitors
| Step | What happens |
|---|---|
| Page load | sdk.js loads activities for the project and compares the current URL to each activity's URL conditions (and audience rules). |
| Match | If an activity matches, the SDK selects an experience (single 100% variant, or weighted random for A/B), applies DOM changes (personalizations, insertions, removals, custom code rules), and records a view. |
| Clicks | Clicks on elements registered as activity metrics fire requests to Przio so the metrics page can aggregate them. |
| SPA navigation | Call PrzioSDK.triggerPersonalization() after route changes so new URLs re-run matching without a full refresh. |
Implementation checklist
sdk.json site with correctdata-project-id.- Activity URL conditions match real production paths (including query strings if you rely on them—verify behavior).
- Audience rules tested if used (
setAudience/ saved segments). - Preview in Select mode; save; set Live for production.
- Activity metrics added for conversion elements; metrics page shows events after traffic.
- A/B: traffic totals 100%; each variant edited separately.
FAQ
Why doesn't the preview load?
Some sites block iframes or send strict CSP. Use Relax preview security in the editor and load again. Live site behavior depends on your own CSP allowing the SDK and Przio endpoints.
Why are metrics zero?
The activity may still be Draft or Inactive, URL rules may not match real traffic, or no visitors have hit the page yet. For clicks, ensure you added activity metrics on the right elements.
Does personalization slow down my site?
The SDK fetches activity definitions and applies changes client-side. Keep variant counts and DOM edits reasonable; heavy custom JS in custom code runs in the visitor browser—test performance.